Vectors, A Vector Field Plotting Utility
David I. Brown
NCAR, P.O. Box 3000
Boulder, Colorado 80307-3000
Table of Contents
1.0 PREFACE
2.0 INTRODUCTION
3.0 SUBROUTINES
3.1 VVECTR (U,V,P,IAM,VVUDMV,WRK)
3.2 VVGETC (CNM,CVL)
3.3 VVGETI (CNM,IVL)
3.4 VVGETR (CNM,RVL)
3.5 VVINIT (U,LU,V,LV,P,LP,M,N,WRK,LW)
3.6 VVRSET
3.7 VVSETC (CNM,CVL)
3.8 VVSETI (CNM,IVL)
3.9 VVSETR (CNM,RVL)
3.10 VVUDMV (XCS,YCS,NCS,IAI,IAG,NAI)
3.11 VVUMXY (X,Y,U,V,UVM,XB,YB,XE,YE,IST)
4.0 OBSOLETE SUBROUTINES
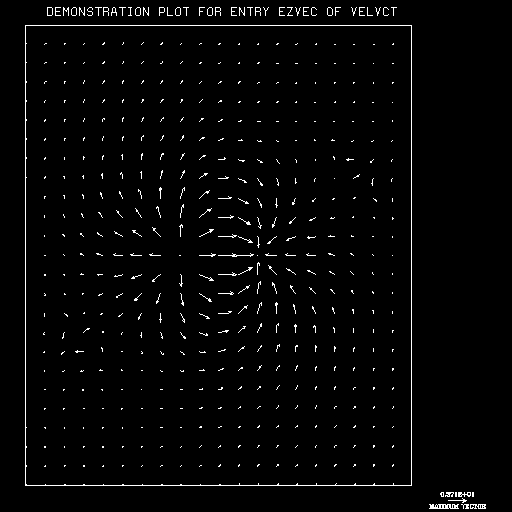
4.1 EZVEC (U,V,M,N)
4.2 FX (X,Y)
4.3 FY (X,Y)
4.4 MXF (X,Y,U,V,SFX,SFY,MX,MY)
4.5 MYF (X,Y,U,V,SFX,SFY,MX,MY)
4.6 VELVCT (U,LU,V,LV,M,N,FLO,HI,NSET,LENGTH,ISPV,SPV)
4.7 VELVEC (U,LU,V,LV,M,N,FLO,HI,NSET,ISPV,SPV)
5.0 PARAMETERS
6.0 ERROR MESSAGES
7.0 EXAMPLES
INDEX
1.0 PREFACE
The vector field plotting utility described here was originally
written in the early 1970's and has previously been known as
VELVCT. Over the years, a number of enhancements have been made, but
the basic capabilities and interface have not changed much. In the
fall of 1992 a more extensive revision was undertaken. Both the
interface and functionality of the package underwent a major
upgrade. There were several goals: first, make the package work more
like other utilities in the NCAR Graphics toolkit suite; second, make
it easier to use in combination with the other utilities; third, allow
easier access to standard coordinate system mappings, including
especially the EZMAP transformations; and fourth, improve the
information content of the final plot. Most of these goals have been
at least partially realized in the current version of the package,
although, as usual, not all the envisioned improvements could be
accomplished in the time allotted to the task. Since it might be
confusing to retain the name of a now obsolete entry point as the
utility name, and moreover, as it now seems unwise to share the
package name with any entry point name, the new name for the NCAR
Graphics vector plotting utility is simply Vectors.
2.0 INTRODUCTION
This document describes the NCAR Graphics utility, known as
Vectors, designed to allow a user to plot vector
fields given two arrays containing the components of the vectors on a
uniform grid in a user-defined coordinate system. In addition, the
user may pass in another array of scalar data defined over the same
grid space independent of but presumably related in some fashion to
the vector data. The utility will then color each vector based on the
scalar value at the same grid point. Alternatively, the user can
choose to color the vectors based on the vector magnitude at the grid
point.
The old utility name, VELVCT, originated as a contraction of 'Velocity
Vector'. Beginning with NCAR Graphics Version 3.2, all new routines,
whether user-entry points or not, are six characters long and begin
with the key letters, 'VV', again standing for 'Velocity Vector'
though of course any 2-dimensional vector field may serve as input to
the package. The old entry points are still supported through a
compatibility version of the VELVCT subroutine, and some, though not
all, of the features provided by the new routines are available to
these entry points by appropriately setting the compatibility mode
internal parameter.
This section is intended to give an overall view of Vectors and
selected aspects of its design; it covers some details, but, in
general, one should refer to the sections SUBROUTINES and PARAMETERS for detailed descriptions of
subroutines and parameters mentioned. (Parameters are mentioned by
name; all the names are of the form XXX, where XXX is a
three-character mnemonic.) The section ERROR
MESSAGES describes error messages written by Vectors. The section
EXAMPLES describes the examples available
for Vectors.
It is assumed that the reader is familiar with NCAR Graphics in
general and has some knowledge of (or can find and read the
documentation for) the utilities AREAS and EZMAP.
2.1 Vectors User-Entry Point Routines
The code to draw a vector field plot (unless using the obsolete
entries points discussed at the end of this section) must include a
call to the routine VVINIT followed at some point by a call to
VVECTR. Before and after the VVINIT call several internal parameter
setting routines may be used to alter the behavior of the vector
plotting code. Some of these parameters must be set before the call to
VVINIT in order to have any (or the correct) effect. In other cases,
however, the user can query the information VVINIT has acquired about
the target data sets using a parameter getting routine, and then
dynamically adjust the parameter to best fit the requirements of the
data, before calling VVECTR.
All the internal parameters have default values; only those which are
to have values different from the default need to be set. The user may
call routines to set the values of parameters as follows:
- VVRSET resets all internal parameters to their default values.
- VVSETC assigns a value of type CHARACTER to a parameter.
- VVSETI assigns a value of type INTEGER to a parameter.
- VVSETR assigns a value of type REAL to a parameter.
In general, once a parameter is given a value by a call to one of
these routines, it retains that value until a similar call resets
it. Thus, many of the parameter-setting calls do not need to be
repeated for each new vector field plot.
The user may retrieve the value of an internal parameter at any time
by calling one of the parameter getting routines:
- VVGETC returns a parameter value of type CHARACTER.
- VVGETI returns a parameter value of type INTEGER.
- VVGETR returns a parameter value of type REAL.
Once you have set required parameters and called VVINIT, drawing the
vector field plot is simply a matter of calling the main entry point
VVECTR.
VVINIT performs the initialization required for VVECTR to interpret
the data properly. The dimensions of the data arrays are copied to
internal variables. Depending on the current value of certain internal
parameters, the grid space indices are mapped into the X,Y
data coordinate system. The mapping from the user
coordinate space to the normalized device coordinate
(NDC, sometimes also known as fractional coordinate)
space is also established using either the routine GETSET, if a
previously established mapping is to be used, or the routine SET, if
Vectors needs to set up the mapping. Note, however, that the
mapping from the data to user coordinate system is left
indeterminate at this point. This is because you may choose from
several pre-defined mappings, such as an EZMAP projection, or
implement a user-defined mapping to implement this
transformation. VVINIT and, for that matter, VVECTR have (almost) no
knowledge of the mapping being performed.
VVINIT then processes the vector component arrays to find the maximum
and minimum vector magnitudes. If a scalar array is to be processed,
it extracts the maximum and minimum scalar data values. If the user is
coloring the vectors and has not predefined a set of threshold values,
the routine sets up an array of values linearly spaced between the
maximum and minimum (scalar data or vector magnitude) values. The user
is responsible for setting up the color table and defining the number
and progression of the colors to be used. If a zero field condition is
discovered, a flag is set, causing VVECTR not to attempt to draw any
vectors.
After the VVINIT call the user can retrieve the maximum and minimum
vector magnitudes and/or scalar data values and based on their value,
alter the appearance of the plot by enlarging the maximum size vector,
constraining the smallest vector to be rendered at some fraction of
the largest vector, or by choosing to eliminate vectors less than some
magnitude. The color threshold values could also be examined and
possibly modified.
You are now free to call VVECTR, causing the vectors to be rendered
according to the established set up. If a border around the plot is
desired, call PERIM(1,0,1,0). Finally, to advance the frame, call the
SPPS routine FRAME.
Vectors contains two user-modifiable routines that are not
invoked directly by the user, but by Vectors itself. The
default versions of these routines contain very simple code that may
handle a basic case, but little more. These routines are as
follows:
- VVUMXY is called when the internal parameter MAP is set to a value
other than zero, one, or two. These three values are pre-defined
mappings, and are handled within the private code of
Vectors. Briefly, the three mappings are 0, Identity
mapping, 1, EZMAP projection, and 2, polar to rectangular. If MAP is
set to any other value, VVUMXY (Velocity Vector - User Map XY) is
invoked, allowing the user to define a custom mapping from
data coordinates to NDC space. Note that, unlike
similar routines in CONPACK, this mapping routine is required to
return the location of both ends of the vector in normalized device
coordinates. If the mapping is non-linear, like the EZMAP projections,
then a technique that effectively maps the instantaneous tangent angle
must be used to map the vector direction.
- VVUDMV is the default name of an externally defined function
passed as a parameter to VVECTR. It is only required when the you want
to draw the vectors masked by an area map generated by the routines in
the AREAS utility. VVUDMV is responsible for deciding which pieces of
a vector to draw according to its area identifier. The default version
of the routine draws all vector segments that have positive valued
area identifiers.
Three Vectors routines are supplied to provide
compatibility with pre-Version 3.2 codes. You may choose from a
variety of compatibility options by setting the compatibility mode
parameter CPM appropriately; this offers considerable flexibility in
making the transition to the new version of the utility.
- VELVCT, the pre-Version 3.2 principal entry point, has been
rewritten to act as a front end to the VVINIT/VVECTR
interface. Depending on the setting of the CPM parameter the input
parameter options and/or the common block variables initialized in the
block data subprogram, VELDAT, may be used to set the corresponding
internal parameters. The CPM parameter also controls whether the old
FX,FY and MXF,MYF vector mapping routines are used instead of the
current mapping routine, VVMPXY. When CPM is set to its default value,
the results of a Vectors call are quite close to what they
would have been pre-Version 3.2,
- EZVEC is a front end to VELVCT and is unchanged from its
pre-Version 3.2 state. It is a simple interface for standard
situations, when detailed control of the plot is not required.
- VELVEC is an older version of VELVCT, now also a front end to it,
and also unchanged for Version 3.2. It differs from the VELVCT call
only in that it contains one less input parameter in its calling
sequence.
2.2 Using Vectors
If the intent is to draw the vector field plot using relatively few
computer resources, the following sequence of calls will suffice:
- Call parameter-setting routines.
- Call VVINIT to initialize the vector field plot.
- Call VVECTR to draw the vectors.
- If a border around the plot is desired, call PERIM(1,0,1,0)
- Call FRAME to advance the plotter frame.
Assuming that step 1 is null and that all default parameter values are
used, the resulting plot will look similar to what would have been
drawn by VELVCT prior to Version 3.2 of NCAR Graphics.
2.3 Coordinate Systems in Vectors
In order to understand the process of transforming the data contained
in the vector component input arrays into arrows of particular length
and direction at various positions on an output plot, it would be
helpful to differentiate unambiguously each stage of the
transformation pipeline within the context of the coordinate systems
defined by NCAR Graphics. In this discussion, the following terms are
used:
- The indices of the input vector component arrays define the
grid coordinate system. It is bounded by the ranges from 1 to
the value of M (argument to VVINIT) along the first dimension,
conventionally the X axis; and from 1 to the value of N (argument to
VVINIT) along the second dimension, conventionally the Y axis.
- The internal parameters XC1, XCM, YC1, and YCN provide a linear
mapping from grid coordinates to the data coordinate
system. Data coordinates provide the natural context for the
data. For instance, a set of wind vector data might use longitudinal
coordinates values for XC1 and XCM; latitudinal values for YC1 and
YCN.
- The internal parameter MAP specifies a mapping, possibly
non-linear, from data to user coordinates. A call to the
SPPS routine, SET, establishes the boundaries of this coordinate
space. If the last argument to SET does not specify a log-scaled axis,
and neither axis is mirror-imaged, user coordinates are
equivalent to GKS world coordinates. When user and
world coordinates are not equivalent, Vectors
accounts for the difference in its mapping routines, although it never
uses world coordinates explicitly. The term "window" is
used rather loosely to refer to the boundaries of either of these
coordinate systems. The intended system is hopefully clear from the
context.
- From the point of view of Vectors, the final transformation
is the mapping from user coordinates to the NDC system,
also known as the fractional coordinate system. The boundaries
of NDC space are also established by the SET call, and must
fall within the range 0.0 to 1.0. They define a "viewport" into the
drawable area of the plotting surface. This transformation may be
affected by the setting of the internal parameter TRT.
- Vectors uses one other system for the specification of
items, such as graphics text strings or minimum arrow size, that
should retain a constant size and position relative to the plot as a
whole. This system has no real name, but is referred to in this
document as "fraction of the viewport width", or occasionally, where
appropriate, "viewport height".
Note that two other coordinate systems used in the VELVCT code prior
to Version 3.2, the integer plotter and metacode
coordinate system, have been retained only in the compatibility
routines; they are not required for any of the low-level rendering
routines used currently.
Given the default values of the parameters XC1, XCM, YC1 and YCN, the
mapping from grid to data coordinate space is an
identity transformation. That is, the data coordinate space
extends from (1.0,1.0) to (REAL(M), REAL(N)). However, you may assign
any desired boundaries to the data coordinate system by setting
XC1, XCM, YC1 and YCN to values of your choice. For satisfactory
results this choice needs to be consistent with the user
coordinate boundaries established by the SET call and the mapping
established by the MAP parameter. In general, the location of an array
element A(I,J) in data coordinate space is given as:
      Xdata = XC1 + (I - 1)*(XCM - XC1)/(M - 1)
      Ydata = YC1 + (J - 1)*(YCN - YC1)/(N - 1)
where (XC1,YC1) is the lower boundary of the data coordinate
space and (XCM,YCN) is the upper boundary.
If the parameter MAP has values between 0 and 2 Vectors handles
the mapping from data space to user and NDC space
internally, using the routine VVMPXY. If MAP has any other value the
user-modifiable routine VVUMXY is called to perform a mapping defined
by the user. Unlike the analogous CONPACK routine, CPMPXY, which has
data coordinate inputs and user coordinate outputs, the
Vectors mapping routines have data coordinate inputs
but NDC outputs. This is because not only position but the
direction of the vector require mapping; to ensure consistent mapping
of the direction it is necessary to output both ends of the vector in
a uniform Cartesian coordinate system. The user coordinate
system cannot meet this test because it could be log-scaled or because
a Y axis unit might not equal an X axis unit.
The mappings handled internally by Vectors are as follows:
- If MAP is set to 0, the data to user space mapping
is an identity. However, if the SET call specifies log-scale axes, or
axes in which an X axis unit is not equal in size to a Y axis unit,
the mapping of the vector direction from user to NDC
space is affected by the setting of the transformation type parameter,
TRT.
- If MAP is set to 1, the data coordinate system is assumed
to define a bounded surface on the globe, with degrees of longitude
extending along the X axis and degrees of latitude along the Y
axis. XC1, XCM, YC1, and YCN, specified in degrees, establish the
boundaries. You cannot use this mapping without first calling routines
in the EZMAP utility to set up a map transformation. Since EZMAP
performs the required SET call, the Vectors SET parameter must
be set to 0 -- no SET call. The Vectors mapping routine uses an
iterative technique involving small differential offsets that relies
on multiple calls to the EZMAP routine, MAPTRA, to map the vector
direction at each grid point.
- When MAP is set to 2, the data coordinates are treated as
representing a polar coordinate space. The first dimension (X Axis) is
mapped to the radial axis, and the second dimension (Y Axis) is mapped
to the angular component. With this in mind you must set XC1, XCM,
YC1, and YCN to appropriate values. The transformation type parameter,
TRT, allows for different interpretations of the vector field data,
depending on whether you consider the mapping as polar locations for
an essentially cartesian space or whether you treat the space itself
as intrinsically radial.
When a user-defined mapping is required, you can modify the user
routine, VVUMXY. If the Vectors routines are loaded from a
binary library, you can usually replace the library version just by
compiling the routine and explicitly linking its object with the NCAR
Graphics library.
2.4 The SET Call
The mapping into the plotter frame depends on the boundaries of the
user coordinate space and the viewport defined in NDC
space. If the user coordinates are not log-scaled and
neither axis is mirrored user coordinates and GKS world
coordinates are the same. In this case, it is possible to define the
user/world coordinate boundaries (also known as the window) and
map them to the viewport using GKS calls. However, since the SPPS
routine SET performs the same task and works under all conditions
recognized by NCAR Graphics, only its use is described here.
A call to the SPPS routine SET has the form
CALL SET (VPL,VPR,VPB,VPT,WDL,WDR,WDB,WDT,LL)
All arguments are REAL except for LL, which is an INTEGER. The first
four arguments must all be between 0 and 1, inclusive; they define a
rectangular area on the plotter frame known as the "viewport". The
next four arguments define the boundaries of the user
coordinate space (the "window"). The final argument indicates whether
the mapping of user coordinates into the viewport is to be
linear or logarithmic in X and Y. See the documentation of the SPPS
utility for further details.
By default, Vectors calls SET. However, by setting the
parameter SET to zero, you may prevent Vectors from doing this;
in that case, one must do the call for oneself or depend on some other
utility (such as EZMAP) to have done it.
If Vectors calls SET, it always uses LL = 1, requesting a
linear-linear mapping from the window to the viewport. The viewport is
positioned as specified by the current values of the parameters VPL,
VPR, VPB, VPT, and VPS. The first four of these specify the boundaries
of a "viewport area", in which the viewport is to be centered and made
as large as possible; the final one determines how the shape of the
viewport is to be chosen. You could, for example, render several plots
within a single plotter frame by setting these parameters to define
separate non-overlapping areas for each plot.
By default, the user coordinate boundaries are set equal to the
data coordinate boundaries, which, in turn, default to the
grid coordinate boundaries (1: M, 1: N) unless the parameters
XC1, XCM, YC1, YCN have non-default values. You may override this
behavior by setting parameters WDL, WDR, WDB, and WDT to non-default
values, explicitly specifying the values used to define the window in
the SET call. Normally you would modify the window setting parameters
only when the parameter MAP has a non-default value, but
Vectors is still expected to perform the SET call. Whereas the
viewport area may be set to any part of the plotter frame, without
fear of losing the plot, you must be careful setting WDL, WDR, WDB,
and WDT, or the region of interest is not likely to match up with the
viewport.
When MAP is set to 1, specifying an EZMAP projection, you should give
the SET parameter a value of 0, since EZMAP must take charge of the
SET call to perform the requested map transformation. If you want to
adjust the viewport size or position in this case, do it using the
EZMAP call MAPPOS.
When MAP is set to 2, specifying a polar coordinate mapping, you may
choose either to leave the SET parameter defaulted and set the
user coordinate boundary parameters WDL, WDR, WDB, and WDT
appropriately, or else to set the SET parameter to zero and make your
own call to the SET routine.
Note that, as long as the parameter MAP is zero, a SET call performed
by Vectors will define the window in such a way as to be
consistent with the ranges of the X and Y coordinates it generates. If
MAP is set non-zero, then you will probably need to set XC1, XCM, YC1,
and YCN to transform the grid coordinates into the range of
data coordinates expected by Vectors' mapping
routine. The call to SET must specify user coordinate
boundaries commensurate with the range generated by the data
coordinate to user coordinate transformation; if Vectors
is to do the call, then you will need to set WDL, WDR, WDB, and WDT to
accomplish this.
2.5 Arrow Length, Spacing, and Position
A common problem with using discrete vector arrows to represent a
vector field is that as the size of the dataset increases, the vectors
become too crowded and the rendering ceases to be intelligible. This
problem may be further compounded when the vector field is passed
through a non-linear transformation, such as a map projection, that
causes many data points to become bunched together in small regions of
the plot. The arrows must either become so small that it is difficult
to distinguish between them, or they overlap and degenerate into an
amorphous mass. Although there is no absolute cure for this problem,
Vectors provides a number of features to help you present the data as
coherently as possible.
2.5.1 Reference length and magnitude
The length of each vector arrow is determined in relation to a vector
reference magnitude that may be specified by the parameter VRM and a
vector reference length that may be specified, as a fraction of the
viewport width, by the parameter VRL. Vectors belonging to the dataset
whose magnitude is equal to the reference magnitude are drawn at the
reference length. By default, if VRM is set to 0.0, the reference
magnitude is the maximum magnitude in the vector field, but it may be
set to any arbitrary value. The default reference length is determined
dynamically based on the viewport and the size of the dataset along
each dimension.
Note that prior to version 4.0.1 of NCAR Graphics, the reference
magnitude was required to be greater than or equal to the largest
vector magnitude in the dataset, and was set using the vector high
cutoff parameter, VHC. For compatibility with older versions, if VRM
has its default value of 0.0, you can still control the reference
magnitude using VHC. The advantage of using VRM is that you can choose
a "nice" value for the reference magnitude without worrying if any
vector magnitudes in the dataset might exceed its value. The arrow in
the Maximum Vector legend now actually represents the reference
magnitude and need not necessarily be the actual maximum magnitude.
2.5.2 Minimum length and magnitude
By default the size of each vector differs from the reference length
by the ratio of its magnitude to the reference magnitude. In practice,
a common result of this strictly proportional representation is that
low magnitude vectors become too small to be rendered with full
detail, particularly on low resolution devices. As a result, their
direction, especially, becomes difficult to decipher. Vectors
provides a parameter, VFR, that allows you to specify, as a fraction
of the reference length, a minimum vector arrow length. When this
resource is set to a value greater than 0.0, the smallest magnitude
vector is rendered at the specified fraction of the reference length,
and intermediate magnitude vectors are rendered at proportionally
intermediate lengths. Setting VFR to 1.0 causes all vector arrows to
be drawn at the reference length.
The parameter VLC specifies the minimum magnitude a vector must have
in order to qualify for drawing. You can use it to eliminate low
velocity vectors in order to concentrate attention on the dominant
features of a vector field. However, note that VLC also has another
role. When it has a value less than 0.0 and VFR is non-zero, its absolute value
specifies the vector magnitude that is rendered at the minimum length
specified by VFR.
2.5.3 Ensuring uniform arrow sizing over a series of plots
In order to ensure that within a series of plots of related data a
particular length always represents the same vector magnitude, you
must always first set the reference magnitude using parameter VRM (or
alternately VHC) explicitly. Otherwise, whatever magnitude happens to be
the maximum in each plot will be rendered at the reference length. In
addition, if you set VFR to a non-zero value, you should be careful to
set VLC to a value less than zero. Otherwise the length that VFR specifies will
be used to represent whatever magnitude happens to be the minimum in
each plot. If you do not want any low magnitude vectors actually
eliminated, simply set VLC to a small negative
number that is less than the smallest magnitude in any of your data sets.
2.5.4 Controlling the spacing between vector arrows
There are two ways to reduce the crowding of a too densely populated
vectorplot. One is to specify array increments greater than unity
along one or both dimensions of the data using the parameters XIN
and/or YIN. This method has the effect of reducing the density
uniformly throughout the data space, and may be the most appropriate
if your plot is overly dense throughout. The second way is to set the
parameter VMD to a value representing, as a fraction of the viewport
width, the minimum distance you want to allow between the locations of
neighboring vector arrows. This method requires that you supply a work
array to VVINIT and VVECTR but it ensures that the minimum distance
between vectors is maintained even after arbitrary non-linear
transformations, like many map projections, from data to NDC space.
2.5.5 Arrow Position
Using the VPO parameter, you can control whether the tail, the head,
or the center of vector arrow is positioned at the location of the
grid point in data space.
2.6 Arrow Styles
Vectors supports three arrow styles: a simple line-drawn arrow, drawn
only using a polyline; a filled arrow with an optional edge line and a
highly configurable shape; and, a wind barb style, which
supports traditional wind barbs glyphs. Each style has its own set of
parameters, although there are other parameters that apply, under
appropriate conditions, to all styles. By default, Vectors uses
line-drawn arrows. Set the parameter AST to 1 in order to activate
filled arrows or to 2 to activate wind barbs.
2.6.1 Line-drawn arrows
Line-drawn vector arrows have a fixed shape which the user cannot
modify. However, you can control the minimum and maximum size of the
vector arrowhead using parameters AMN and AMX. This allows you to
ensure that the arrowheads remain recognizable for small-magnitude
vectors while not becoming excessively large for high-magnitude
vectors.
You can set the thickness of the polylines used to render line-drawn
arrows using the LWD parameter. You may notice that as the lines are
made thicker the arrows begin to take on a rather fuzzy look. This is
an unavoidable consequence of using thick lines, (at least where there
is no control of the line join method), and one of the motivations for
the development of filled vector arrows.
2.6.2 Filled arrows
Vectors draws filled vector arrows using a solid filled area
with an edge outline. Filled arrows have several advantages over
line-drawn arrows:
- The edges can be sharply defined no matter how wide you make the
arrow body or head.
- There is more area available to apply colors to the arrow and
therefore the colors are more visible.
- You have much greater control over the shape of the vector
arrows.
- Since the edge can be drawn in a separate color from the fill, you
can distinguish the individual vector arrows more easily in areas
where the vectors overlap, or where the fill has a similar color to
the background color.
Naturally filled arrows have a few drawbacks as well:
- They take a bit longer to draw.
- If the vector arrows overlay other graphics, such as a contour
plot, the filled arrows may obscure too much of the information
underneath.
- Since there are more parameters to adjust, you may find yourself
spending more time figuring out how they work and what looks best for
your data.
Either the filled area or the edge or both may be colored individually
based on the values in the TVL threshold level array. Assuming
individual coloring is enabled (see following section) the arrow color
mode parameter ACM determines how the colors apply to the arrow fill
and edges. When not colored individually the fill color is determined
by the current GKS fill color index and the edge color by the current
GKS line color index. Appropriate settings of the ACM parameter can
cause either the fill or the edge not to be drawn.
The AFO parameter specifies whether the edge should be drawn first
with the fill on top or vice versa. Drawing the fill on top ensures
that the full extent of the filled area appears, even when the vector
arrow is very small. However, in this case you should ensure that the
linewidth parameter LWD is given a value greater than 1.0. Otherwise
the edges will appear broken and poorly formed.
Seven parameters control the shape of filled vector arrows. Four of
these specify the shape of an arrow drawn at the reference length:
- AWR specifies the width of the arrow body.
- AXR specifies the distance from the tip of the arrowhead to its
trailing point along the axis of arrow body.
- AYR specifies the distance from the arrow body's side to the
trailing point of the arrowhead in a direction perpendicular to the
arrow body axis.
- AIR specifies the distance from the tip of the arrowhead to the
interior point where the arrowhead meets the arrow body.
Each of these parameters is expressed as a fraction of the reference length.
The other three parameters, AWF, AXF, and AYF, set minimum sizes for
AWR, AXR, and AYR, respectively. They are specified as fractions of
the parameter with which they are associated. So, for example, if you
set AWF to 0.25, the width used for the minimum length arrow will be
equal to 0.25 * AWR * the reference length in NDC. The widths used for
intermediate length arrows will be sized proportionally between the
minimum width and the reference width. This implies that if you set
AWF to 1.0, the arrow width will remain constant for all filled
arrows, no matter what their length. Setting any of these parameters
to 0.0 causes their associated arrow dimension to vary in strict
proportion to the arrow length.
2.6.3 Wind barbs
Wind barb glyphs consist of a shaft parallel to the vector
direction, and zero or more pennants and/or ticks spaced
along the shaft starting at the end nearest the direction
from which the flow is coming. However, if the magnitude of the
velocity is less than 2.5, a circle replaces the shaft. Half
ticks represent 5 units of magnitude, full ticks represent 10 units,
and pennants represent 50 units. By convention, the units are
knots. The pennants are drawn using a filled polygon, while the ticks,
the shaft, and the calm circle are all rendered with polylines.
Wind barbs differ from the other arrow styles in several respects:
- Wind barbs maintain a basically uniform length for all
magnitudes; this length is set using the vector reference length
parameter VRL.
- Since the length does not vary, the minimum vector fractional length
parameter, VFR, is ignored.
- When using the wind barb style, a circle appears at the locations
of zero-magnitude vectors. With other arrow styles, nothing is drawn
at these locations.
- Like filled arrows, wind barbs are a composite of line and fill
elements, but wind barbs force the fill to be drawn using the same
color as the lines.
- Masking to an areamap has not been implemented for wind barbs.
Otherwise, the wind barb style shares the capabilities of the other
styles, including the ability to be individually colored based on
values in the TVL threshold level array.
As with line elements in all the arrow styles, the linewidth of
wind barb line elements is set using the LWD parameter. When not using
multi-colored vectors, specify the wind barb color by setting the GKS
polyline color index. There are five parameters that are specific to
the wind barb arrow style:
- WBA sets the angle of the wind barb ticks in degrees clockwise
from the vector direction. It also sets the angle of the hypotenuse of
the the wind bar pennant triangles.
- WBT sets the wind barb tick size as a fraction of the overall wind barb
length. It also sets the length of the hypotenuse of the wind barb pennant
triangles.
- WBD sets the distance between ticks as a fraction of the overall
wind barb length. The distance between pennants is set to one half this
distance.
- WBC sets the diameter of wind barb calm circles as a fraction of the
overall windbarb length.
- WBS is a scaling factor that is applied to the magnitude of each
vector prior to computing the number of barbs and pennants for each wind
barb. However, it does not currently affect the vector magnitude
reported in the minimum or maximum vector legend.
2.7 Color Threshold Level Control
A major addition to Vectors for Version 3.2 is the ability to
color the vectors either based on the values in an associated scalar
data array or based on the vector's magnitude. When a related scalar
field, such as temperature or pressure, serves as the basis for
determining the color of a set of wind vector data using a suitably
graduated color palette, patterns may emerge that would be hard to
observe when viewing the data sets separately.
Vectors will not set up a color palette. You must call the GKS routine
GSCR to assign RGB values for each color index you intend to use. An
example in the examples section includes code for a sample color
palette that varies from blue at one end of the scale to red at the
other. Currently, a maximum palette of 255colors is allowed. As in all
of NCAR Graphics, the color indices used can range from 1 to 255, with
index 0 reserved for the background color. You are also responsible
for setting up the GKS color index array used by Vectors to determine
the color to use for data within a certain range. For example,
assuming (1) a palette of 14 colors is desired, (2) the desired RGB
values have previously been stored in a 3 x n array called
"RGB", and (3) a consecutive series of GKS indices starting at N + 1
is to be used (where N is a previously initialized value between 0 and
255 - 14) you could accomplish both these tasks in a single simple
loop:
      DO 100 I=1,14,1
        CALL GSCR (1,I+N,RGB(1,I),RGB(2,I),RGB(3,I))
        CALL VVSETI('PAI -- Parameter Array Index', I)
        CALL VVSETI('CLR -- GKS Color Index', I+N)
      100 CONTINUE
The setting of the color threshold value control parameter, CTV,
determines how Vectors handles the selection of color threshold
values. If you want Vectors to choose the threshold values, set
CTV to a positive value: 1 to color by vector magnitude or 2 to color
by scalar array. Set the number of levels parameter NLV to select the
number of threshold levels (and the number of colors, with a maximum
of 255) to use. When Vectors chooses the threshold levels, it
finds the maximum and minimum values in the data, then simply divides
the range into NLV equally spaced divisions. The resulting NLV
threshold values are stored into the threshold level array, TVL. The
first value stored is the minimum data value plus one division
increment while the last value is the maximum data value itself. As
each vector is processed its color is chosen by finding the first
entry in the threshold level array greater than or equal to the data
value associated with the vector, retrieving the array subscript for
this entry, and then setting the GKS polyline color index to the value
in the color index array, CLR, accessed by the same
subscript. Assuming as above that 14 levels are desired, the following
code would tell Vectors to choose the color levels based on
data in the scalar array:
      CALL VVSETI('NLV - Number of Threshold Levels', 14)
      CALL VVSETI('CTV - Color Threshold Value Control', 2)
To set up the threshold level array yourself, make CTV negative: -1 to
color by vector magnitude or -2 to color by scalar array value. When
CTV is less than or equal to 0, Vectors will not touch the
values in the TVL array. Set NLV as before to the number of levels
desired, then set the first NLV members of the threshold array to the
desired threshold values, keeping in mind from the preceding
description how Vectors chooses the color index based on the
threshold array values. A basic rule to observe is that the threshold
values should increase monotonically as the array subscripts
increase. Note also that if the vector's associated data value is
larger than all the values in the threshold value array, it will be
assigned the color subscripted by the index for the maximum data
value. Again assuming 14 colors and also that the desired threshold
values are stored in an array called "TVALS", the following code would
set up the threshold array and inform Vectors not to modify its
contents:
      CALL VVSETI('NLV - Number of Threshold Levels', 14)
      CALL VVSETI('CTV - Color Threshold Value Control', -2)
      DO 200 I=1,14,1
        CALL VVSETI('PAI -- Parameter Array Index', I)
        CALL VVSETR('TVL -- Threshold Value Array', TVALS(I))
  200 CONTINUE
You can also use the color threshold control parameter to retain a
threshold array set up by a previous plot (within the same program
execution). Suppose you have a program to create several plots using
scalar arrays with varying maximum and minimum values. When
Vectors picks the threshold values, the color associated with a
particular data value may change from plot to plot. To ensure that a
given data value is associated with the same color for the complete
series of plots, pick one plot (preferably the one with the greatest
range) and by setting CTV to a positive value, allow Vectors to
set up the threshold array. For the subsequent plots, set CTV
negative. All plots will then use the same threshold array, and
therefore the colors will be associated with identical ranges of
data.
2.8 Other Color Facilities
Besides the implementation of vector coloring according to a related
scalar data field or vector magnitude discussed earlier, there are
several other points to make about the way the Vectors utility
supports the use of color in NCAR Graphics plots.
First you should note that even if you do not take advantage of
multiple colors for vectors (the color threshold value control
parameter, CTV is set to 0), it is still possible to adjust the color
of the vector field as a whole simply by setting the GKS polyline
color index at any point before the call to VVECTR.
Basic text elements, such as the Zero Field text block, are by default
colored using the current text color index. You may override this
behavior by setting the color parameter associated with the text
element to a value greater than or equal to 0, causing the parameter
value to be used as the GKS color index for the text. In addition, the
maximum and minimum vector text blocks have an additional option that
can only be activated when the vectors are colored according to
magnitude. When the option is active, the text and the vector arrow
both are colored using the color associated with that magnitude of
vector within the plot.
By default, Vectors draws the optional vector magnitude labels
using the same color index as the vector arrow with which each one is
associated. However, here again, you may assign a positive or zero
value to the parameter LBC to give the labels a uniform color of your
choice, or assign a value less than zero to the parameter if you want
them to be drawn using the current GKS text color index.
2.9 Masked Vector Overlays Using an Area Map
At times you may need to overlay a vector field on a plot created by
another NCAR Graphics utility, such as Conpack. There may be certain
areas, such as the boxes containing contour level labels, where you do
not want the vector arrows to appear. Beginning with Version 3.2, the
Vectors utility supports vector masking based on the contents of a
area map previously established using routines from the Areas
utility. Most of the information required to use the area map routines
is documented elsewhere, either in the descriptions of the Conpack
utilities that work with area maps or in the actual documentation of
the Areas utility itself. You create the area map and the underlying
plot just as you normally would. Then, in order to create the vector
overlay, you would need to take the following steps:
- Insert an EXTERNAL declaration for the user-defined subroutine
that actually draws the masked vectors. The name of the subroutine
must be passed to the VVECTR call. If the default version of the
subroutine supplied with the Vectors utility can suffice, the
statement would simply be:
EXTERNAL VVUDMV
- Call VVSETI to set the MSK parameter to a positive value: 1 for
high-precision masking, greater than 1 for low precision masking.
- Make any other necessary calls to the parameter setting
routines. In particular you would probably want to tell Vectors
not to do a SET call, since Vectors should work in the same
coordinate space as the underlying plot used to create the area
map. The data coordinate parameters, XC1, XCM, YC1, and YCN and the
MAP parameter also need to be set to coincide appropriately with the
underlying plot.
- Call VVINIT as usual.
- Call VVECTR, passing the previously created area map and the
external drawing subroutine in the argument list.
2.10 Special Values
If the datum at a particular grid point is unavailable or unreliable,
a "special" value, typically a value outside the possible range of
valid data, may be assigned to the array element associated with the
grid point in question. Since Vectors has at least two and
perhaps three separate arrays as input, it uses several parameters to
control processing of special value data points. Each of the three
input arrays may have its own separately defined special value. The
parameters USV, VSV, and PSV are used to set the special values for
the U vector component array, the V vector component array, and the P
scalar data array, respectively.
Two more parameters control the way Vectors handles the special
values. The parameter SVF handles special value processing for the
vector component arrays. You may choose from several different methods
for deciding whether to draw a vector, given that either one or both
of the component array elements may contain a special value. The
special color parameter SPC determines the fate of a vector that would
otherwise be drawn, but whose associated scalar array data element has
a special value. Depending on the setting of SPC, Vectors may
eliminate the vector from the plot, or draw it using a special color
of your choice, probably outside the palette of colors used to render
the range of legitimate scalar data.
2.11 Supplementary Text
You may control the size, justification, color, visibility, and, where
appropriate, the content and location of several supplementary text
objects in order to improve the appearance and informativeness of a
Vectors plot.
- The Maximum Vector text block consists of an horizontal arrow,
sized the same as the vector with the maximum magnitude in the
plot. Centered directly above the arrow is a numeric string expressing
the value of this magnitude in exponential format. Below the arrow an
explanatory text string, "Maximum Vector" by default, appears. The
default location of this text block is underneath the plot viewport
just to the right of center.
- The Minimum Vector text block is similar to the Maximum Vector
block, except that, naturally enough, it contains a representation of
the minimum magnitude vector. This block is located, by default,
underneath the plot viewport and left of center.
- The Zero Field text block contains a message ("Zero Field", by
default), printed whenever the field contains no vectors that can be
rendered. By default, this block is located in the center of the plot
viewport.
- If vector labeling is activated, Vectors will output a
text string near each vector and oriented in the same direction, that
represents the magnitude of each individual vector. By default the
values are scaled and rounded in such a way that they can all be
represented by a 3 digit integer string. Since the text must be quite
small on a normal sized plot if the graphic content is to remain
intelligible, this option is primarily intended for debugging.
- Although not part of the graphics plot itself, you may obtain
supplementary information about the operation of Vectors and
the data sets employed by setting the vector statistics parameter, VST
to 1. Information about the number of vectors plotted, maximum and
minimum vector magnitudes, and, when relevant, maximum and minimum
scalar data values, will be written to the default output unit.
2.12 Vectors' Grid Window
Note that the grid window for Vectors is not the same as the
grid window for AUTOGRAPH, since the former is expressed with respect
to the plotter frame and the latter is expressed with respect to the
AUTOGRAPH "graph window". There is an easy conversion from one to the
other, however. If AGFL, AGFR, AGFB, and AGFT specify the AUTOGRAPH
graph window and AGDL, AGDR, AGDB, and AGDT specify the AUTOGRAPH grid
window and CGDL, CGDR, CGDB, and CGDT specify the Vectors grid window,
then the following relationships ensure coincidence of the AUTOGRAPH
and Vectors grid windows:
      CGDL=AGFL+AGDL*(AGFR-AGFL)
      CGDR=AGFL+AGDR*(AGFR-AGFL)
      CGDB=AGFB+AGDB*(AGFT-AGFB)
      CGDT=AGFB+AGDT*(AGFT-AGFB)
Note what happens when AGFL and AGFB are 0's and AGFR and AGFT are
1's, which is the default situation; in that case CGDL=AGDL,
CGDR=AGDR, CGDB=AGDB, and CGDT=AGDT.
2.13 GKS Considerations
Certain assumptions are made by Vectors about the state of GKS,
as follows:
- Like all the utilities in NCAR Graphics, Vectors assumes
that GKS has been opened and that the desired workstations have been
opened and activated. The statement
CALL OPNGKS
calls the SPPS routine OPNGKS, the GKS equivalent of which is
      CALL GOPKS (6,0)
      CALL GOPWK (1,2,1)
      CALL GACWK (1)
creating a single metacode workstation associated with FORTRAN unit
2.
- Similarly, at the end of one's program, the workstations must be
deactivated and closed and then GKS must be closed. The statement
CALL CLSGKS
calls the SPPS routine CLSGKS, the GKS equivalent of which is
      CALL GDAWK (1)
      CALL GCLWK (1)
      CALL GCLKS
- It is assumed that the aspect source flags for various quantities
are set to "individual". (NCAR GKS does this by default, but other
packages may not.) To make sure that all the aspect source flags are
set correctly, use the following code:
      DIMENSION IASF(13)
      ...
      DATA IASF / 13*1 /
      ...
      CALL GSASF (IASF)
- Color-setting by Vectors is done by executing calls to the
GKS routines GSPLCI and GSTXCI, with user-defined color indices as
arguments. The association of these color indices with colors on the
workstations must have been defined previously by the user. This
should be done by calling the GKS routine GSCR. The statement
CALL GSCR (IW,IC,RC,GC,BC)
defines, for workstation IW, color index IC, with RGB components RC,
GC, and BC. To be consistent with the SPPS routines OPNGKS and CLSGKS,
use IW = 1. The value of IC may be any non-negative integer. By
default, color index 0 is associated with the color black, which is
defined by (RC,GC,BC) = (0.,0.,0.) and is used as the background
color, while color index 1 is associated with the color white, which
is defined by (RC,GC,BC) = (1.,1.,1.).
3.0 SUBROUTINES
All Vectors routines added for NCAR Graphics Version 3.2 and later
have six-character names beginning with the letters 'VV'. Current user
entry points and user-modifiable routines are described in detail in
alphabetical order in this section. Obsolete routines appear in the
section following entitled OBSOLETE
SUBROUTINES.
3.1 VVECTR (U,V,P,IAM,VVUDMV,WRK)
This routine manages the coordinate system mapping, color setting,
auxiliary text output, and drawing of the vector field plot, according
to the specifications established by the parameter setting routines
and the initialization routine, VVINIT.
3.1.1 Usage
A call to VVINIT must precede the first call to VVECTR, and is again
required any time the vector or scalar array data changes, any of the
coordinate control parameters are modified, or the number of color
threshold levels is modified when Vectors is given the
responsibility of setting up the color threshold value array. However,
the user may modify text elements or any of the rendering control
parameters, and if assuming responsibility for setting up the color
threshold array, may also modify the color array parameters, in
between multiple invocations of VVECTR.
Arguments to VVINIT establish the sizes of the two or three data
arrays. VVINIT places these values into common block variables where
they become available to VVECTR. Therefore no size arguments need
appear in the VVECTR argument list. When there is no scalar data
array, and area masking is not enabled, all but the first two
arguments to VVECTR may have dummy values and the invocation would be
something like:
CALL VVECTR(U,V,IDM,IDM,IDM,IDM)
where IDM is an arbitrary variable, INTEGER or REAL, that need not
have been initialized. However, any time the color threshold control
parameter, CTV has an absolute value of 2, the auxiliary scalar data
array is expected, and the P scalar array variable needs to be
specified.
The masking capability supported by Vectors allows the user to
overlay vector fields on top of graphics produced by other utilities,
such as CONPACK contour plots, without encroaching on areas, like
label boxes, that should appear in the foreground, uncovered. Normally
the area map should be generated and used in the normal way (as
described in the AREAS and CONPACK documentation) before calling any
routines in the Vectors utility. When the parameter MSK has a
non-zero value, masking is enabled and a previously created area map
must be passed to VVECTR. VVECTR examines the map, returning an error
if the map is invalid or there are more area groups than
Vectors can handle, currently 64. Otherwise it only uses the
map as a member of the argument list when invoking one of the Areas
routines, ARDRLN or ARGTAI. The user must also pass in a
user-definable masked drawing subroutine. A simple version of this
subroutine, named VVUDMV, is supplied with the Vectors utility,
and may suffice for basic masked drawing operations. There is a
separate entry describing the usage and argument list for this
subroutine in this section.
The last argument in the calling sequence, WRK, is used only when the
parameter VMD (Vector Minimum Distance) is given a value greater than
0.0. In this case, Vectors uses the array to keep track of the
location of each vector in NDC space so that the distances between
vectors can be compared. Based on these comparisons, Vectors
eliminates some vectors such that the remaining vectors are separated
by at least the specified distance. Otherwise the WRK argument is
ignored, and may be passed a dummy argument value.
3.1.2 Arguments
U (REAL 2 dimensional array, dimensioned as specified in last
call to VVINIT, input): By default, assumed to contain the first
dimensional axis components of the vector field. However, if PLR is
non-zero, it is treated as containing the vector magnitudes.
V (REAL 2 dimensional array, dimensioned as specified in last
call to VVINIT, input): By default, assumed to contain the second
dimensional axis components of the vector field. However, if PLR is
non-zero, it is treated as containing the vector angles.
P (REAL 2 dimensional array, dimensioned as specified in last
call to VVINIT, input): Array of scalar data that may be used to color
the vectors. The grid points are assumed to coincide with the grid
points of the U and V arrays. Required only if CTV has an absolute
value of 2; otherwise this argument is ignored and may be assigned a
dummy value.
IAM (INTEGER array, unknown dimension, input): Area
map array previously established by calls to routines in the Areas
utility. It is not examined or modified by Vectors. Required only if
MSK is set to a non-zero value; otherwise it is ignored and may be
assigned a dummy value.
VVUDMV (EXTERNAL subroutine, input): User-definable masked
drawing subroutine. See the entry, "VVUDMV", in this section for a
discussion of the usage and argument list required for this
subroutine. Required only if MSK is set to a non-zero value; otherwise
it is ignored and may be assigned a dummy value.
WRK (REAL array, dimensioned as specified in last call to
VVINIT, input/output): Work array required only if the parameter VMD
is set to a value greater than 0.0. Otherwise may be set to a dummy
value.
3.2 VVGETC (CNM,CVL)
This routine is used to get the current value of a parameter of type
CHARACTER
3.2.1 Usage
Use the statement
CALL VVGETC (CNM,CVL)
at any time to retrieve in CVL the current character value of the
parameter whose name is CNM.
3.2.2 Arguments
CNM (CHARACTER, input) is the name of a parameter whose
character value is to be retrieved. Only the first three characters of
CNM are examined. The three characters may either be entirely upper or
entirely lower case; mixed case is not recognized. It is recommended
that the rest of the character string be used to improve the
readability of the code. For example, instead of just 'MXT', use 'MXT
- Maximum Vector Text String'.
CVL (CHARACTER, output) is a variable in which the value of the
parameter specified by CNM is to be returned.
3.3 VVGETI (CNM,IVL)
This routine is used to get the current value of a parameter of type
INTEGER.
3.3.1 Usage
Use the statement
CALL VVGETI (CNM,IVL)
at any time to retrieve in IVL the current integer value of the
parameter whose name is CNM. If that parameter is an array, the array
element specified by the current value of the parameter PAI will be
the one retrieved.
3.3.2 Arguments
CNM (CHARACTER, input) is the name of a parameter whose integer
value is to be retrieved. Only the first three characters of CNM are
examined. The three characters may either be entirely upper or
entirely lower case; mixed case is not recognized. It is recommended
that the rest of the character string be used to improve the
readability of the code. For example, instead of just 'PLR', use 'PLR
- Polar Input Mode'.
IVL (INTEGER, output) is a variable in which the value of the
parameter specified by CNM is to be returned.
3.4 VVGETR (CNM,RVL)
This routine is used to get the current value of a parameter of type
REAL.
3.4.1 Usage
Use the statement
CALL VVGETR (CNM,RVL)
at any time to retrieve in RVL the current real value of the parameter
whose name is CNM. If that parameter is an array, the array element
specified by the current value of the parameter PAI will be the one
retrieved.
3.4.2 Arguments
CNM (CHARACTER, input) is the name of a parameter whose real
value is to be retrieved. Only the first three characters of CNM are
examined. The three characters may either be entirely upper or
entirely lower case; mixed case is not recognized. It is recommended
that the rest of the character string be used to improve the
readability of the code. For example, instead of just 'DMX', use 'DMX
- Device Maximum Vector Size'.
RVL (REAL, output) is a variable in which the value of the
parameter specified by CNM is to be returned.
3.5 VVINIT (U,LU,V,LV,P,LP,M,N,WRK,LW)
VVINIT performs initialization tasks required before VVECTR may be
called to plot a vector field, including copying array size
information into internal common block variables, establishing
coordinate system mappings and boundaries, determining the maximum and
minimum vector magnitudes and scalar array values, and, if required,
setting up the color threshold value array.
3.5.1 Usage
Call VVINIT before the first invocation of VVECTR and again any time
you modify the contents of the input data arrays. You may precede a
VVINIT call with any number of calls to the Vectors parameter setting
routines (VVSETC, VVSETI, or VVSETR). After the VVINIT call, you may
still change certain parameters before calling VVECTR. (Consult the
section, PARAMETERS, for further
information on this point.)
Set up the two vector component arrays prior to calling VVINIT. To
permit multiple purpose use of the array space, the VVINIT argument
list includes both the actual size and an assumed size for the first
dimension of each input array. Due to FORTRAN array ordering
conventions, only the assumed size needs to be specified for the
second dimension. (Note: when using the C bindings, mentally exchange
all references to first and second dimensions in this discussion.) The
arguments LU, LV, and LP contain the actual size of the first
dimensions of arrays U, V, and P respectively. Since the grid
locations for each of the data arrays are assumed to coincide, a
single argument, M, represents the assumed size of the first dimension
for all the arrays. Similarly, the argument, N, is the assumed size of
the second dimension. The only requirement for the actual second
dimension size is that it be greater than or equal to N for each
array.
The array specified by the WRK argument and its associated size
specifier, LW, are used only when the parameter VMD (Vector Minimum
Distance) is given a value greater than 0.0. In this case, Vectors
uses the array to keep track of the location of each vector in NDC
space so that the distances between vectors can be compared. Based on
these comparisons, Vectors eliminates some vectors such that the
remaining vectors are separated by at least the specified distance. If
VMD is less than or equal to 0.0, you may assign an arbitrary dummy
value to WRK, but you should set LW to the integer value 0.
3.5.2 Arguments
U (REAL 2-dimensional array, dimensioned LU x
n: n >= N, input): By default, assumed to contain
the first dimensional Cartesian components of the vector
field. However, if PLR is non-zero, it is treated as containing the
vector magnitudes.
LU (INTEGER, input): Actual value of the first dimension of
array U.
V (REAL 2-dimensional array, dimensioned LV x
n: n >= N, input): By default, assumed to contain
the second dimensional Cartesian components of the vector
field. However, if PLR is non-zero, it is treated as containing the
vector angles.
LV (INTEGER, input): Actual value of the first dimension of
array V
P (REAL 2-dimensional array, dimensioned LP x
n: n >= N, input): Array of scalar data that may
be used to color the vectors. The grid points are assumed to coincide
with the grid points of the U and V arrays. Required only if CTV has
an absolute value of 2; otherwise this argument is ignored and may be
assigned a dummy value.
LP (INTEGER, input): Actual value of the first dimension of
array P
M (INTEGER, input): Number of contiguous elements along the
first dimensional axis containing data to be processed in each of the
arrays U, V, and P (if used).
N (INTEGER, input): Number of contiguous elements along the
second dimensional axis containing data to be processed in each of the
arrays U, V, and P (if used).
WRK (REAL, array dimensioned n: n >= LW,
input/output): Work array required only if the parameter VMD is set to
a value greater than 0.0. If required must be dimensioned greater or
equal to 2 * M * N. Otherwise may be set to a dummy value.
LW (INTEGER, input): Assumed size of the array WRK. If the
parameter VMD is set to a value greater than 0.0, must be set to a
value less than or equal to the dimension of the WRK array, but
greater than or equal to 2 * M * N. Otherwise, this argument should be
assigned the integer value 0.
3.6 VVRSET
Resets all parameters to their initial default values.
3.6.1 Usage
To reset all parameters to their default values:
CALL VVRSET
There are no arguments.
3.6.2 Arguments
None.
3.7 VVSETC (CNM,CVL)
This routine is called to set the value of a parameter of type
CHARACTER.
3.7.1 Usage
Use the statement
CALL VVSETC (CNM,CVL)
to give the parameter whose name is CNM the character value CVL.
3.7.2 Arguments
CNM (CHARACTER, input) is the name of a parameter to be given a
character value. Only the first three characters of CNM are
examined. The three characters may either be entirely upper or
entirely lower case; mixed case is not recognized. It is recommended
that the rest of the character string be used to improve the
readability of the code. For example, instead of 'ZFT', use 'ZFT -
Zero Field Text String'.
CVL (CHARACTER, input) is an expression, the value of which is
to be given to the parameter specified by CNM.
3.8 VVSETI (CNM,IVL)
This routine is called to set the value of a parameter of type INTEGER.
3.8.1 Usage
Use the statement
CALL VVSETI (CNM,IVL)
to give the parameter whose name is CNM the integer value IVL. If that
parameter is an array, the element specified by the current value of
PAI will be the one changed.
3.8.2 Arguments
CNM (CHARACTER, input) is the name of a parameter to be given
an integer value. Only the first three characters of CNM are
examined. The three characters may either be entirely upper or
entirely lower case; mixed case is not recognized. It is recommended
that the rest of the character string be used to improve the
readability of the code. For example, instead of 'VPO', use 'VPO -
Vector Positioning Mode'.
IVL (INTEGER, input) is an expression, the value of which is to
be given to the parameter specified by CNM.
3.9 VVSETR (CNM,RVL)
This routine is called to set the value of a parameter of type
REAL.
3.9.1 Usage
Use the statement
CALL VVSETR (CNM,RVL)
to give the parameter whose name is CNM the real value RVL. If that
parameter is an array, the element specified by the current value of
PAI will be the one changed.
3.9.2 Arguments
CNM (CHARACTER, input) is the name of a parameter to be given a
real value. Only the first three characters of CNM are examined. The
three characters may either be entirely upper or entirely lower case;
mixed case is not recognized. It is recommended that the rest of the
character string be used to improve the readability of the code. For
example, instead of 'VFR', use 'VFR - Minimum Vector Fractional
Length'.
RVL (REAL, input) is an expression, the value of which is to be
given to the parameter specified by CNM.
3.10 VVUDMV (XCS,YCS,NCS,IAI,IAG,NAI)
This routine is the user-definable external subroutine used to draw
masked vectors. The default version of the routine draws any polyline
all of whose area identifiers are greater than or equal to zero.
3.10.1 Usage
'VVUDMV' is the name given to the default version of the masked vector
drawing routine, and it is also the name given to the argument through
which the external subroutine is passed to VVECTR. However, you may
use any acceptable FORTRAN identifier as the name of a user-defined
version of the routine. The substitute routine must have an argument
list equivalent to the default version of VVUDMV. Also, whether or not
the default version is used, the subroutine that calls VVECTR should
contain an external declaration of the routine, such as:
EXTERNAL VVUDMV
If the MSK parameter is set to the value 1, specifying high precision
masking, Vectors sends one set of X and Y polyline coordinate
arrays to the area masking routine, ARDRLN, for each vector
arrow. ARDRLN subdivides the polyline into pieces such that each
smaller polyline has a single area identifier with respect to each
area identifier group, then makes a call to VVUDMV for each polyline
piece. While the default version of VVUDMV only checks to see that
none of the area identifiers are negative, a user-defined version
could perform more complicated decision processing based on knowledge
of the meaning of specific area identifier groups and/or area
identifier values. Note that, before invoking VVUDMV, ARDRLN modifies
the user coordinate space by making the following calls:
      CALL GETSET(VPL,VPR,VPB,VPT,WDL,WDR,WDB,WDT,LLG)
      CALL SET(VPL,VPR,VPB,VPT,VPL,VPR,VPB,VPT,1)
These calls temporarily turn the user to NDC mapping
into an identity, allowing the user to call any of the routines,
CURVE, CURVED, or the GKS routines GPL or GFA (for filled vector
arrows) to render the polygon piece, without worrying about a possible
non-identity mapping between user and world
coordinates. If MSK has a value greater than 1, specifying low
precision masking, Vectors calls the routine ARGTAI to get the
area identifiers with respect to the area identifier groups for a
single point that locates the base position of the
vector. Vectors then calls the VVUDMV routine itself, passing
the coordinate arrays for a complete vector arrow. Thus, a vector
arrow whose base position is within an area to be masked can be
eliminated, but an arrow whose base position is nearby, but outside, a
masked area may intrude into the area. Also, in this case, since
faster rendering is the goal, Vectors does not convert the
coordinate arrays into normalized device coordinates and do the
identity SET call. Therefore, the user should use only CURVE or CURVED
to render the polyline, unless there is no possibility of a
non-identity user to world coordinate mapping.
VVUDMV contains a separate block of code that handles masked drawing
of filled vectors (parameter AST set to 1). However, the default code
is unable to determine how to close open polygon fragments
correctly. Therefore it completely eliminates vectors that partially
protrude into a masked region when high precision masking is
specified.
The current version of Vectors supports masked drawing with up
to 64 area groups. Vectors will exit with an error message if
an area map with more than 64 groups is passed to it.
3.10.2 Arguments
XCS (REAL array, assumed size NCS, input): Array of X
coordinates of the points defining the polyline with the given set of
area identifiers.
YCS (REAL array, assumed size NCS, input): Array of Y
coordinates of the points defining the polyline with the given set of
area identifiers.
NCS (INTEGER, input): Number of points; assumed size of the X
and Y coordinate arrays, XCS and YCS.
IAI (INTEGER array, assumed size NAI, input): Array of area
identifier values. Each value represents the area identifier with
respect to the area group in the area group array with the same array
index.
IAG (INTEGER array, assumed size NAI, input): Array of
area-identifier groups.
NAI (INTEGER, input): Number of area identifier groups. The
current version of Vectors supports up to 64 area groups.
3.11 VVUMXY (X,Y,U,V,UVM,XB,YB,XE,YE,IST)
The user may modify this routine to define a custom mapping of vectors
from a data coordinate system aligned with the natural
boundaries of the vector field to the uniform normalized device
coordinate (NDC) system suitable for generating a plot on an
output device. It has same parameters as the internal Vectors
routine, VVMPXY, used for the predefined mappings employed when the
MAP parameter has a value between 0 and 2.
3.11.1 Usage
The user does not call VVUMXY. Vectors calls it only when the
parameter MAP has a value other than 0, 1, or 2, the mappings handled
by Vectors internally. Note that unlike other user-modifiable
mapping routines in NCAR Graphics, such as CPMPXY, that map a single
point into the user coordinate system, this routine returns two
points, representing both ends of the vector, scaled for magnitude, in
the normalized device coordinate (NDC) system. The
NDC system is used for output because, as a coordinate system
guaranteed to be rectangular and uniform, it serves as a convenient
reference system to help map both vector magnitude and direction
correctly. The term uniform, as used in this discussion, means
that an arbitrary numerical increment along either the X or Y axis has
the same length given any offset from the coordinate system
origin. The user coordinate system does not qualify, because it
may be log-scaled, or the X units may have a different size from the Y
units.
In order to implement a custom mapping, you must pick a unique mapping
code (a positive integer greater than 2), and then modify VVUMXY to
recognize and respond to the chosen code. In the standard distribution
of NCAR Graphics, this routine resides in the file, 'vvumxy.f'. VVUMXY
has access to a common block called VVMAP that contains a number of
variables used to record the current transformation state. In order to
accommodate a variety of mapping implementations, VVMAP provides more
information than normally required. Consider the values stored in
VVMAP as strictly read-only. One essential member of this common block
is IMAP, which contains the value currently assigned to the MAP
parameter.
When implementing a non-linear mapping, an iterative differential
technique will most likely be required. Look at the routine, VVMPXY,
in 'vvmpxy.f', which handles the pre- defined mappings, for examples
of the method. Both the default transformation (MAP set to 0), in order to account for
possible log scaling of the user coordinate axes, and also the Ezmap
projection (MAP set to 1) use such a
technique. Basically the idea is that the vector components must be
proportionally reduced in size enough that an effectively
"instantaneous" angle can be calculated, although they must not become
so small that the calculation is adversely affected by the floating
point precision available for the machine. Additionally, checks must
be put in place to prevent the increment from stepping off the edge of
the coordinate system space. The pre-defined mappings step in the
opposite direction to find the angle whenever an increment in the
original direction would fall off the edge.
For more information, see the section titled Coordinate Systems in Vectors.
3.11.2 Arguments
X (REAL, input) Location of the vector along the first
dimensional axis in the data coordinate system. When MAP is 0,
this is the X Axis. If MAP is 1, it is the longitudinal axis, and if
MAP is 2, it is the radial axis. For other values of MAP, those that
cause VVUMXY to be invoked, the interpretation is up to the author of
the mapping routine.
Y (REAL, input) Location of the vector along the second
dimensional axis in the data coordinate system. When MAP is 0,
this is the Y Axis. If MAP is 1, it is the latitudinal axis, and if
MAP is 2, it is the angular axis. For other values of MAP, those that
cause VVUMXY to be invoked, the interpretation is up to the author of
the mapping routine.
U (REAL, input) U component of the vector. If TRT is set to 1,
the direction of the U component is tangent to the direction of the
first dimensional axis in the data coordinate system at the
location of the vector. If TRT is set to 0, and MAP has a value of 0
or 2, the direction of the U component is parallel to the horizontal
(X axis) in NDC space.
V (REAL, input) V component of the vector. If TRT is set to 1,
the direction of the V component is normal to the direction of the
first dimensional axis in the data coordinate system at the
location of the vector. If TRT is set to 0, and MAP has a value of 0
or 2, the direction of the V component is parallel to the vertical (Y
axis) in NDC space.
UVM (REAL, input) Magnitude of the U and V components,
SQRT(U*U+V*V). Although this value could be calculated within the
routine, it is more efficient for the calling routine to supply the
value as an argument, since it is needed for other purposes at a
higher level.
XB (REAL, output) Location of the vector starting point along
the horizontal (X axis) in NDC space, before adjustment based
on the value of the vector positioning parameter, VPO.
YB (REAL, output) Location of the vector starting point along
the vertical (Y axis) in NDC space, before adjustment based on
the value of the vector positioning parameter, VPO.
XE (REAL, output) Location of the vector ending point along the
horizontal (X axis) in NDC space, before adjustment based on
the value of the vector positioning parameter, VPO.
YE (REAL, output) Location of the vector ending point along the
vertical (Y axis) in NDC space before adjustment based
on the value of the vector positioning parameter, VPO.
IST (REAL, output) Status of the vector mapping operation: 0
indicates success, negative values indicate that the mapping failed;
positive values are reserved and should not be used by the implementor
of a mapping routine.
4.0 OBSOLETE SUBROUTINES
4.1 EZVEC (U,V,M,N)
EZVEC is a simpler front-end to the VELVCT interface. It may be used
to plot a vector field in a single call.
4.1.1 Usage
U and V are 2-dimensional vector component arrays, whose first
dimensions must be equal to the value of M, and whose second
dimensions must equal or exceed the value of N. Given an appropriate
setting of the compatibility mode parameter, CPM, many of the VELVCT
argument list options are accessible by making calls to
VVSETx routines before invoking EZVEC. When creating new
code, however, users are strongly encouraged to make use of the
VVINIT/VVECTR interface.
4.1.2 Arguments
U (REAL 2-dimensional array, dimensioned M x
n: n >= N, input) By default, assumed to contain
the first-dimensional Cartesian components of the vector
field. However, if PLR is non-zero, it is treated as containing the
vector magnitudes.
V (REAL 2-dimensional array, dimensioned M
xn: n >= N, input) By default, assumed to contain
the second-dimensional Cartesian components of the vector
field. However, if PLR is non-zero, it is treated as containing the
vector angles.
M (INTEGER, input) Actual size of the first dimension of arrays
U and V.
N (INTEGER, input) Assumed size of the second dimension of
arrays U and V.
4.2 FX (X,Y)
Given the X and Y coordinates of a point in the grid coordinate
system, the function FX returns the X coordinate of the point in user
coordinate space.
4.2.1 Usage
The user does not invoke the function, FX, directly. In older versions
of NCAR Graphics, the user modified the functions, FX and FY, in order
to implement custom mappings from grid coordinates to
user coordinates. These functions were used throughout NCAR
Graphics, not just in the Vectors utility. For compatibility
with existing code, calls to any of the Vectors primary entry
points predating Version 3.2 (EZVEC, VELVCT, or VELVEC), by default
use FX and FY to map from grid to user
coordinates. However, by appropriately setting the compatibility mode
parameter, CPM, the user can choose whether the FX and FY functions or
the new VVMPXY routine is invoked when using any of the primary entry
points supported by Vectors.
Unlike the Version 3.2 mapping routine VVMPXY, whose input coordinates
are in the data coordinate system, FX takes input in the
grid coordinate system. Therefore, any required conversions
into the data coordinate system must be performed within the
function prior to the mapping into user coordinates. The
common block VVMAP, available for inclusion within the FX routine,
supplies the information necessary to perform the conversion into
data coordinate space, as well as for the mapping from
data to user coordinates. The default version of FX
simply performs an identity mapping from grid to
user coordinate space.
4.2.2 Arguments
X (REAL, input): The X coordinate of a vector location in the
grid coordinate system.
Y (REAL, input) The Y coordinate of a vector location in the
grid coordinate system.
4.3 FY (X,Y)
Given the X and Y coordinates of a point in the grid coordinate
system, the function FY returns the Y coordinate of the point in user
coordinate space.
4.3.1 Usage
The user does not invoke the function, FY, directly. In older versions
of NCAR Graphics, the user modified the functions, FX and FY, in order
to implement custom mappings from grid coordinates to
user coordinates. These functions were used throughout NCAR
Graphics, not just in the Vectors utility. For compatibility
with existing code, calls to any of the Vectors primary entry
points predating Version 3.2 (EZVEC, VELVCT, or VELVEC), by default
use FX and FY to map from grid to user
coordinates. However, by appropriately setting the compatibility mode
parameter, CPM, the user can choose whether the FX and FY functions or
the new VVMPXY routine is invoked when using any of the primary entry
points supported by Vectors.
Unlike the Version 3.2 mapping routine VVMPXY, whose input coordinates
are in the data coordinate system, FY takes input in the
grid coordinate system. Therefore, any required conversions
into the data coordinate system must be performed within the
function prior to the mapping into user coordinates. The
common block VVMAP, available for inclusion within the FX routine,
supplies the information necessary to perform the conversion into
data coordinate space, as well as for the mapping from
data to user coordinates. The default version of FX
simply performs an identity mapping from grid to user coordinate
space.
4.3.2 Arguments
X (REAL, input): The X coordinate of a vector location in the
grid coordinate system.
Y (REAL, input): The Y coordinate of a vector location in the
grid coordinate system.
4.4 MXF (X,Y,U,V,SFX,SFY,MX,MY)
MXF is a user-modifiable function that, given one endpoint of a vector
in both grid and metacode coordinates, returns the X
coordinate of the other endpoint in the metacode coordinate
system.
4.4.1 Usage
The user does not invoke the function, MXF, directly. However, any
time that the compatibility mode parameter CPM is set such that the FX
and FY routines are used to map the first endpoint of the vector, the
functions MXF and MYF are used to determine the second endpoint. First
FX and FY are invoked to determine the vector location in user
coordinates, then this point is converted into metacode
coordinates; MXF is passed the coordinates of the point both in
grid space and in metacode space, along with the
vector components and a scale factor used to convert the vector
magnitude into a length in the metacode coordinate
system.
If the mapping from data to user and from user to
metacode coordinates is linear MXF is not hard to use: the
default version simply multiplies the U component of the vector (the
component parallel to the X grid axis) by the scale factor, SFX, and
adds it to the X coordinate of the first point in metacode
coordinates, MX. This value is returned as the function
value. However, if the mapping is anywhere non-linear, the vector
directional angle may change across the transformation, and an
iterative differential technique must be employed to map the second
endpoint of the vector. If creating a new mapping, the user is
strongly urged to use the user-modifiable routine VVUMXY, rather than
attempting to work with MXF and MYF.
4.4.2 Arguments
X (REAL, input): The X coordinate of a vector location in the
grid coordinate system.
Y (REAL, input) The Y coordinate of a vector location in the
grid coordinate system.
U (REAL, input) The U component of the vector at the data point
specified by arguments X and Y.
V (REAL, input) The V component of the vector at the data point
specified by arguments X and Y.
SFX (REAL, input) Scale factor used to convert the vector
magnitude to a length in metacode coordinates.
SFY (REAL, input) Scale factor used to convert the vector
magnitude to a length in metacode coordinates. In the current
implementation this value is the same as the value of SFX.
MX (INTEGER, input) X coordinate of the vector location in
metacode coordinates.
MY (INTEGER, input) Y coordinate of the vector location of the
vector in metacode coordinates.
4.5 MYF (X,Y,U,V,SFX,SFY,MX,MY)
MXF is a user-modifiable function that, given one endpoint of a vector
in both grid and metacode coordinates, returns the X
coordinate of the other endpoint in the metacode coordinate
system.
4.5.1 Usage
The user does not invoke the function, MYF, directly. However, any
time that the compatibility mode parameter CPM is set such that the FX
and FY routines are used to map the first endpoint of the vector, the
functions MXF and MYF are used to determine the second endpoint. First
FX and FY are invoked to determine the vector location in user
coordinates, then this point is converted into metacode
coordinates; MYF is passed the coordinates of the point both in
grid space and in metacode space, along with the
vector components and a scale factor used to convert the vector
magnitude into a length in the metacode coordinate
system.
If the mapping from data to user and from user to
metacode coordinates is linear MYF is not hard to use: the
default version simply multiplies the V component of the vector (the
component parallel to the Y grid axis) by the scale factor, SFY, and
adds it to the Y coordinate of the first point in metacode
coordinates, MY. This value is returned as the function
value. However, if the mapping is anywhere non-linear, the vector
directional angle may change across the transformation, and an
iterative differential technique must be employed to map the second
endpoint of the vector. If creating a new mapping, the user is
strongly urged to use the user-modifiable routine VVUMXY, rather than
attempting to work with MXF and MYF.
4.5.2 Arguments
X (REAL, input): The X coordinate of a data point in the
grid coordinate system.
Y (REAL, input) The Y coordinate of a data point in the
grid coordinate system.
U (REAL, input) The U component of the vector at the data point
specified by arguments X and Y.
V (REAL, input) The V component of the vector at the data point
specified by arguments X and Y.
SFX (REAL, input) Scale factor used to convert the vector
magnitude to a length in metacode coordinates.
SFY (REAL, input) Scale factor used to convert the vector
magnitude to a length in metacode coordinates. In the current
implementation this value is the same as the value of SFX.
MX (INTEGER, output) X coordinate of the vector location in
metacode coordinates.
MY (INTEGER, output) Y coordinate of the vector location in
metacode coordinates.
4.6 VELVCT (U,LU,V,LV,M,N,FLO,HI,NSET,LENGTH,ISPV,SPV)
VELVCT plots a vector field, given two 2-dimensional vector component
arrays, U and V. Certain characteristics of the plot may be controlled
by adjusting the values given to the input arguments. Other less
frequently changed characteristics may be affected by modifying
VELDAT, the BLOCK DATA routine that initializes members of the common
blocks VEC1 and VEC2. In addition, depending on the value given to the
compatibility parameter, CPM, many options may be controlled by
setting internal parameters using VVSETx routines.
4.6.1 Usage
Beginning with version 3.2 of NCAR Graphics, the VELVCT entry point
has been recoded as a front end to the VVINIT/VVECTR interface to
Vectors. The compatibility mode parameter, CPM, controls the degree to
which a call to the Version 3.2 VELVCT emulates the older
call. Appropriate settings of CPM can separately answer each the
following three questions regarding the level of emulation:
- Should FX, FY, MXF, and MYF rather than VVMPXY perform the mapping
to user coordinates?
- Should the input arguments FLO, HI, NSET, LENGTH, ISPV, SPV
override the current values of the corresponding Vectors'
internal parameters?
- Should the values contained in the common blocks VEC1 and VEC2
override the current values of corresponding Vectors' internal
parameters?
Given the default value of CPM, all these questions are answered in
the affirmative, and a call to VELVCT gives a reasonably faithful
emulation of the older version's behavior. However, even in this case,
it is possible to use the parameter-setting routines to control the
behavior of features that have no counterpart in the older version of
VELVCT, as long as the feature is accessible without calling the new
interface. For instance, you could control the vector linewidth by
setting the LWD parameter, although you could not draw vectors masked
to an area map because doing so requires direct invocation of VVECTR
with the proper input arguments.
The following two tables show how the VELVCT input arguments and
VEC1/VEC2 common block members map into internal parameters currently
supported by Vectors:
| Input Argument | Internal Parameter |
| FLO | VLC (VLC is set to -FLO if FLO is positive, 0.0 otherwise) |
| HI | VHC (VHC is set to -HI if HI is positive, 0.0 otherwise) |
| NSET | SET (NSET = 0 is approximately equivalent to SET = 1) |
| LENGTH | VRL (LENGTH in Plotter Address Units is converted to VRL
as a fraction of the viewport width) |
| ISPV | SVF |
| SPV(1) | USV |
| SPV(2) | VSV |
| Common Block Member | Internal Parameter |
| EXT | VPS |
| ICTRFG | VPO |
| ILAB | LBL |
| IOFFD | DPF |
| RMN | AMN (RMN in metacode coordinates is converted to AMN
as a fraction of the viewport width) |
| RMX | AMX (RMX in metacode coordinates is converted to
AMX as a fraction of the viewport width) |
| SIZE | LBS (Character size in metacode coordinates is converted
to LBS as a fraction of viewport width.) |
| INCX | XIN |
| INCY | YIN |
| | MNT (When common blocks VEC1 and VEC2 override parameter
settings, MNT is always set to ' ', indicating that the minimum vector
text block is not to be displayed.) |
| IOFFM | MXT (If IOFFM is non-zero, MXT is set to ' '. indicating
that the maximum text block is not to be displayed. Otherwise MXT is
set to the string 'MAXIMUM VECTOR' |
| IOFFM | MXX (If IOFFM is 0, MXX is set to a computed value that,
as a fraction of the viewport width, specifies a point 0.05 in NDC
left of the right hand edge of the plotter frame.) |
| IOFFM | MXY (If IOFFM is 0, MXY is set to a computed value that,
as a fraction of the viewport height, specifies a point 0.005 in NDC
up from the bottom edge of the plotter frame.) |
| IOFFM | MXP (If IOFFM is 0, MXP is set to -2, indicating that the
text block should be lower-right justified. |
Note that the emulation of the maximum vector text block differs from
the older implementation in that it now uses high-quality text.
4.6.2 Arguments
U (REAL 2-dimensional array, dimensioned LU x
n: n >= N, input): By default, assumed to
contain the first-dimensional Cartesian components of the vector
field. However, if PLR is non-zero, it is treated as containing the
vector magnitudes.
LU (INTEGER, input): Actual value of the first dimension of
array U.
V (REAL 2-dimensional array, dimensioned LV x
n: n >= N, input): By default, assumed to contain
the second-dimensional Cartesian components of the vector
field. However, if PLR is non-zero, it is treated as containing the
vector angles.
LV (INTEGER, input): Actual value of the first dimension of
array V.
M (INTEGER, input): Number of contiguous elements along the
first dimensional axis containing data to be processed in each of the
arrays, U and V.
N (INTEGER, input): Number of contiguous elements along the
second dimensional axis containing data to be processed in each of the
arrays, U and V.
FLO (REAL, input) Minimum vector magnitude allowed to be
displayed in the plot.
HI (REAL, input) Maximum vector magnitude allowed to be
displayed in the plot. If set to 0.0 there is no upper limit
imposed.
NSET (INTEGER, input) Flag that controls how and when the SET
call is invoked. If NSET is 0, VELVCT establishes the viewport and the
window to properly scale plotting instructions to the standard
configuration. PERIM is called to draw a border. If NSET is greater
than zero, VELVCT assumes that the user has established the window and
viewport in such a way as to properly scale the plotting instructions
generated by VELVCT. PERIM is not called. If NSET is less than zero,
VELVCT places the contour plot within the limits of the user's current
window and viewport. PERIM is not called.
LENGTH (INTEGER, input) The length in plotter address units
(PAUs) used to render the vector with the greatest magnitude that is
eligible for plotting. A vector is eligible for plotting if it is less
than or equal to the value of HI, unless HI is 0.0 in which case all
vectors are eligible. If LENGTH is set to 0.0, the length selected is
one half the diagonal length of a grid cell assuming a linear mapping
of the grid coordinate space into the viewport.
ISPV (INTEGER, input) Flag to control the special value
feature. 0 means that the feature is not in use. 1 means that if the
value of U(I,J)=SPV(1) the vector will not be plotted. 2 means that if
the value of V(I,J)=SPV(2) the vector will not be plotted. 3 means
that if either U(I,J)=SPV(1) or V(I,J)=SPV(2) then the vector will not
be plotted. 4 means that if U(I,J)=SPV(1) and V(I,J)=SPV(2), the
vector will not be plotted.
SPV (REAL array, dimensioned 2, input) An array of length 2
which gives the value in the U array and the value in the V array
which denote special values. This argument is ignored if ISPV=0. The
default values are 1.0E12.
4.7 VELVEC (U,LU,V,LV,M,N,FLO,HI,NSET,ISPV,SPV)
The VELVEC call is identical to the VELVCT call except that there is
no LENGTH parameter to allow adjustment of the realized length of the
maximum vector magnitude.
4.7.1 Usage
VELVEC is used identically to VELVCT except that there is no provision
for adjusting the realized length of the maximum vector magnitude.
4.7.2 Arguments
The arguments to VELVEC are identical in use to the corresponding
arguments in the VELVCT call.
5.0 PARAMETERS
The behavior of Vectors is controlled by parameters stored in
internal common blocks accessible to its routines that require access
to them.
5.1 Parameter Names
Each of the parameters of Vectors is identified by a
three-character mnemonic name. For example, NLV is the name of the
parameter specifying the number of colors and threshold levels used to
color the vector field and MSK is the name of a parameter used as a
flag to allow the user to specify that the vectors are or are not to
be drawn masked to an area map.
5.2 Parameter Types
Each parameter is intrinsically of type CHARACTER, INTEGER, or REAL,
but the type of the parameter is not implied by the form of its name;
one must read the description of the parameter to determine its
type.
5.3 Parameter Defaults
Each parameter has a default value which is intended to yield a
reasonable, useful, default behavior. To modify the behavior of
Vectors routines, one changes the values of the appropriate
parameters at the appropriate time.
5.4 Parameter Access
The value of a parameter may be set using one of the three routines
VVSETC, VVSETI, and VVSETR. Each of these routines has as its first
argument a character string beginning with the three-character name of
the parameter and as its second argument an expression of the type
implied by the last character of the routine name ("C" for
"CHARACTER", "I" for "INTEGER", or "R" for "REAL"). Similarly, the
current value of a parameter may be retrieved using one of the three
routines VVGETC, VVGETI, and VVGETR, each of which has as its first
argument the name of the parameter and as its second argument a
variable of the type implied by the last character of the routine
name.
In general, once a parameter is given a particular value, it retains
that value until it is given a new value by the user. However, a
number of parameters are read-only to the user meaning that their
values may be retrieved by the VVGETx routines but an attempt
to set them using the VVSETx routines will result in an error. These
parameters are intended to provide the user with useful information
about the state of the program that may be helpful in determining how
to perform the next operation.
5.5 Parameter-Name Arguments
Only the first three characters of the parameter-name argument in
calls to the parameter access routines are examined. The user is
encouraged to add additional text in order to make the code more
understandable. For example, a call to set the number of color
threshold levels might read
CALL VVSETI ('NLV - Number of Threshold Levels',13)
Note that since the dimension of the parameter name variable is
defined as 'CHARACTER*(*)', there is no limit to the number of
characters used to comment the call.
5.6 Automatic Type Conversion
Normally, one would use VVSETI to set parameters of type INTEGER and
VVSETR to set parameters of type REAL. However, since automatic
conversion is done as necessary, this need not be the case. One could,
for example, use either of the two statements
      CALL VVSETI ('USV - U Array Special Value',-9999)
      CALL VVSETR ('USV - U Array Special Value',-9999.0)
to set the U array special value (which is intrinsically REAL) to
-9999.0. The first has the virtue of being two characters
shorter. Similarly, one could use either of the two statements
      CALL VVSETI ('CTV - Color Threshold Levels',18)
      CALL VVSETR ('CTV - Color Threshold Levels',18.)
to set the number of contour levels (which is intrinsically INTEGER)
to 18. (In this case, of course, the first of the two statements seems
to make better sense.) If a REAL parameter is to be given a
non-integral value (like 3.14159), then VVSETR must be used, of
course. Note that the argument passing rules of FORTRAN must still be
respected: an INTEGER argument passed to VVSETR will have the usual
"undefined" results.
5.7 Automatic Restriction of Parameter Values
Some parameters may take on any possible value of the proper
type. Others are restricted to a certain range. In some cases,
out-of-range parameters are simply constrained to some value within
the range. In other cases, where it seems dangerous to second-guess
what the user has in mind, an error is returned and the program
halts.
5.8 Parameter Arrays
Some of the parameters are actually arrays. For example, the parameter
CLR, which specifies a color index for each color threshold level, is
actually an array dimensioned to the value of the FORTRAN PARAMETER,
'IPLVLS', currently set to a value of 255. In order to access the Ith
element of such a parameter array, one must somehow specify the value
of the index I. This is done by creating one parameter, named PAI, to
serve as a "parameter array index". Thus, to set the color index of
the tenth threshold level to 12, one would use the following code:
      CALL VVSETI ('PAI - Parameter Array Index',10)
      CALL VVSETR ('CLR - Color Index',12)
5.9 Parameters Categorized
This section contains a list of all Vectors parameters
categorized by function along with a short descriptive phrase. It also
notes which of the categories may safely be set in between the call to
VVINIT and VVECTR. The section following is an alphabetical listing of
all parameters including a detailed description.
5.9.1 Global Control Parameters
These parameters provide miscellaneous global control of the
Vectors utility.
- PAI - Parameter Array Index - Integer
- CPM - Compatibility Mode - Integer
5.9.2 Coordinate System Control
These parameters (along with the mapping subroutine, VVMPXY or VVUMXY)
establish the mapping through a series of coordinate systems starting
with the array indices that define the basic grid and ending with the
Normalized Device Coordinates. Any non-default values must be set
prior to calling VVINIT.
- SET - SET Call Flag - Integer
- XIN - X Axis Array Increment (Grid) - Integer
- YIN - Y Axis Array Increment (Grid) - Integer
- XC1 - X Coordinate Value at Array Index 1 (World) - Real
- XCM - X Coordinate Value at Array Index M (World) - Real
- YC1 - Y Coordinate Value at Array Index 1 (World) - Real
- YCN - Y Coordinate Value at Array Index N (World) - Real
- WDL - Window Left Boundary (User) - Real
- WDR - Window Right Boundary (User) - Real
- WDB - Window Bottom Boundary (User) - Real
- WDT - Window Top Boundary (User) - Real
- VPL - Viewport Left Boundary (NDC or Fractional) - Real
- VPR - Viewport Right Boundary (NDC or Fractional) - Real
- VPB - Viewport Bottom Boundary (NDC or Fractional) - Real
- VPT - Viewport Top Boundary (NDC or Fractional) - Real
- VPS - Viewport Shape - Integer
- MAP - Map Transformation Code - Integer
- TRT - Transformation Type - Integer
5.9.3 Input Data Control
These parameters control the interpretation of the input data, and
allow the user to place restrictions on the range of data
represented. Any non-default values must be set prior to calling
VVINIT.
- SVF - Special Value Flag - Integer
- USV - U Array Special Value - Real
- VSV - V Array Special Value - Real
- PSV - P Array Special Value - Real
- SPC - Special Color - Integer
- PLR - Polar Input Mode - Integer
5.9.4 Color Control
These parameters are used to control the set up of the color threshold
array and the color index array. If CTV has a positive value, VVINIT
modifies NLV members of the TVL threshold array. Otherwise, these
parameters may be set between the call to VVINIT and VVECTR.
- CTV - Color Threshold Value Control - Integer
- NLV - Number of Color Levels - Integer
- CLR - Array of GKS Color Indices - Integer Array
- TVL - Array of Threshold Values - Real Array
5.9.5 Rendering Control
These parameters allow the user to make various adjustments to the
rendering of the vector field plot. Parameters in this category may be
set between the call to VVINIT and VVECTR. A number of parameters have
an effect only for a specific arrow style (line-drawn, filled or wind barb).
- MSK - Mask To Area Map Flag - Integer
- VRL - Vector Reference Length - Real
- VFR - Minimum Vector Fractional Length - Real
- VRM - Vector Reference Magnitude - Real
- VLC - Vector Low Cutoff Value - Real
- VHC - Vector High Cutoff Value - Real
- LWD - Vector Linewidth - Real
- VPO - Vector Positioning Mode - Integer
- AST - Arrow Style - Integer
- AMN - Arrow Head Minimum Size (line-drawn arrows only) - Real
- AMX - Arrow Head Maximum Size (line-drawn arrows only) - Real
- ACM - Arrow Color Mode (filled arrows only) - Integer
- AFO - Arrow Fill Over Arrow Lines (filled arrows only) - Integer
- AIR - Arrow Interior Reference Fraction (filled arrows only) - Real
- AWF - Arrow Width Fractional Minimum (filled arrows only) - Real
- AWR - Arrow Width Reference Fraction (filled arrows only) - Real
- AXF - Arrow X-Coord Fractional Minimum (filled arrows only) - Real
- AXR - Arrow X-Coord Reference Fraction (filled arrows only) - Real
- AYF - Arrow Y-Coord Fractional Minimum (filled arrows only) - Real
- AYR - Arrow Y-Coord Reference Fraction (filled arrows only) - Real
- WBA - Wind Barb Angle (wind barbs only) - Real
- WBC - Wind Barb Calm Circle Size (wind barbs only) - Real
- WBD - Wind Barb Distance Between Ticks (wind barbs only) - Real
- WBS - Wind Barb Scale Factor (wind barbs only) - Real
- WBT - Wind Barb Tick Size (wind barbs only) - Real
5.9.6 Supplementary Text Control Parameters
These parameters control the placement and appearance of various text
elements associated with a vector field plot produced by
Vectors. Parameters in this category may be set between the
call to VVINIT and VVECTR.
- LBL - Vector Label Flag - Integer
- DPF - Vector Label Decimal Point Control Flag - Integer
- LBS - Vector Label Character Size - Real
- LBC - Vector Label Color - Integer
- MNS - Minimum Vector Text Block Character Size - Real
- MNX - Minimum Vector Text Block X Coordinate - Real
- MNY - Minimum Vector Text Block Y Coordinate - Real
- MNP - Minimum Vector Text Block Positioning Mode - Integer
- MNC - Minimum Vector Text Block Color - Integer
- MNT - Minimum Vector Text String - Character* 36
- MXS - Maximum Vector Text Block Character Size - Real
- MXX - Maximum Vector Text Block X Coordinate - Real
- MXY - Maximum Vector Text Block Y Coordinate - Real
- MXP - Maximum Vector Text Block Positioning Mode - Integer
- MXC - Maximum Vector Text Block Color - Integer
- MXT - Maximum Vector Text String - Character* 36
- ZFS - Zero Field Text Block Character Size - Real
- ZFX - Zero Field Text Block X Coordinate - Real
- ZFY - Zero Field Text Block Y Coordinate - Real
- ZFP - Zero Field Text Block Positioning Mode - Integer
- ZFC - Zero Field Text Block Color - Integer
- ZFT - Zero Field Text String - Character* 36
- VST - Vector Statistics Output Flag
5.9.7 Read-Only Informational Parameters
These parameters may be used to retrieve information about the state
of the Vectors utility. The may be retrieved at any time, but
may not contain useful information at all stages of the processing.
- VMN - Minimum Displayed Vector Magnitude - Real
- VMX - Maximum Displayed Vector Magnitude - Real
- DMN - Minimum Vector Size (NDC) - Real
- DMX - Maximum Vector Size (NDC) - Real
- PMN - Minimum Scalar Array Value - Real
- PMX - Maximum Scalar Array Value - Real
5.10 Parameter Description
Parameter descriptions follow, in alphabetical order. Each description
begins with a line giving the three-character mnemonic name of the
parameter, the phrase for which the mnemonic stands, the intrinsic
type of the parameter, and an indication of whether or not it is an
array.
5.10.1 ACM - Arrow Color Mode -
Integer
ACM controls how color is applied to filled vector arrows. It applies
only when AST has the value 1. Its behavior also
depends on the setting of the parameter CTV. Assuming that CTV is set
to a non-zero value, implying that multi-colored vectors are desired,
ACM has the following settings:
| Value | Effect |
| -2 | Multi-colored fill; outline off |
| -1 | Fill off; multi-colored outline |
| 0 (default) | Multi-colored fill; mono-colored outline |
| 1 | Mono-colored fill; multi-colored outline |
| 2 | Multi-colored fill; multi-colored outline |
Mono-colored outlines use the current GKS polyline color
index. Mono-colored fill uses the current GKS fill color index. When
CTV is set to 0, both the fill and the outlines become mono-colored,
and therefore only modes -2, -1, and 0 remain distinguishable. The
default value is 0.
5.10.2 AFO - Arrow Interior Reference Fraction - Real
If AFO is set to 1, the perimeter outline of a filled vector arrow is
drawn first, underneath the fill. In this case, you must set the line
thickness parameter (LWD) to a value greater than unity in order for
the line to appear completely. The advantage of drawing the line
underneath is that the full extent of the fill appears, resulting in a
crisper, more sharply defined arrow; when the line is drawn on top of
the fill using a different color index, the fill color may be
partially or completely obscured, especially for small vector
arrows. AFO has an effect only when the parameter AST is set to 1.
The default value of AFO is 1.
5.10.3 AIR - Arrow Interior Reference Fraction - Real
AIR specifies the distance from the point of the arrowhead of a filled
vector arrow drawn at the reference length to the point where the
arrowhead joins with the line extending to the tail of the
arrow. Its value represents a fraction of the reference length. This
distance is adjusted proportionally to the X component of the
arrowhead size for vector arrows whose length differs from the
reference length. See VRL for an explanation of how the reference
length is determined. AIR has an effect only when AST is set to
1. AIR is allowed to vary between 0.0 and 1.0 and its default value is
0.33.
5.10.4 AMN - Arrow Head Minimum Size - Real
Specifies a minimum length for the two lines representing the point of
the vector arrow head, as a fraction of the viewport width. AMN has an
effect only for line-drawn vector arrows (parameter AST set to
0). Normally the arrow head size is scaled proportionally to the
length of the vector. This parameter allows you to ensure that the
arrow head will remain recognizable even for very short vectors. Note
that you can cause all the arrowheads in the plot to be drawn at the
same size if you set AMN and AMX to the same value. If you set both
AMN and AMX to 0.0 the arrowheads will not be drawn at all. The
default value is 0.005.
5.10.5 AMX - Arrow Head Maximum Size - Real
Specifies a maximum length for the two lines representing the point of
the vector arrow head, as a fraction of the viewport width. AMX has
an effect only for line-drawn vector arrows (parameter AST set to
0). Normally the arrow head is scaled proportionally to the length of
the vector. This parameter allows you to ensure that the arrow heads
do not become excessively large for high magnitude vectors. Note that
you can cause all the arrowheads in the plot to be drawn at the same
size if you set AMN and AMX to the same value. If you set both AMN and
AMX to 0.0 the arrowheads will not be drawn at all. The default value
is 0.05.
5.10.6 AST - Arrow Style - Integer
If AST is set to 0, the vector arrows are drawn using lines only. When
AST is set to 1, the vectors are plotted using variable width filled
arrows, with an optional outline. If AST is set to 2, wind barb glyphs
are used to represent the vectors.
There are parameters for controlling the appearance of each
style. These have an effect only for one value of AST. However,
certain parameters apply to all arrow styles. Here is a table of
parameters that affect the appearance of vectors and how their
behavior is affected by the setting of AST:
When filled arrows are used, colors associated with the threshold
levels may be applied to either or both the fill or the outline of the
arrow. When fill is drawn over the outline (AFO set to 1), LWD should
be set to a value greater than 1.0 in order for the outline to be
fully visible. The default value of AST is 0.
5.10.7 AWF - Arrow Width Fractional Minimum - Real
AWF specifies the width of a filled arrow drawn at the minimum length,
as a fraction of the width of an arrow drawn at the reference
length. If AWF has the value 0.0, then the ratio of the arrow width to
the arrow length will be constant for all arrows in the plot. If given
the value 1.0, the width will itself be constant for all arrows in the
plot, regardless of length. See VFR for a discussion of how the
minimum length is determined. AWF has an effect only when AST is set
to 1. AWF is allowed to vary between 0.0 and 1.0 and its default
value is 0.25.
5.10.8 AWR - Arrow Width Reference Fraction - Real
AWR specifies the width of a filled vector arrow drawn at the
reference length, as a fraction of the reference length. See VRL for
an explanation of how the reference length is determined. AWR has an
effect only when AST is set to 1. AWR is allowed to vary between 0.0
and 1.0 and its default value is 0.1.
5.10.9 AXF - Arrow X-Coord Fractional Minimum - Real
AXF specifies the X component of the head of a filled vector arrow
drawn at the minimum length, as a fraction of the X component of the
head of an arrow drawn at the reference length. The X component of the
arrowhead is the distance from the point of the arrowhead to a point
along the centerline of the arrow perpendicular to the arrowhead's
rear tips. If AXF has the value 0.0, then the ratio of the X component
of the arrowhead size to the arrow length will be constant for all
vectors in the plot. If given the value 1.0, the arrowhead X component
will itself be constant for all arrows in the plot, regardless of
their length. See VRL for an explanation of how the reference length
is determined. AXF has an effect only when AST is set to 1. AXF is
is allowed to vary between 0.0 and 1.0 and its default value is
0.25.
5.10.10 AXR - Arrow X-Coord Reference Fraction - Real
AXR specifies the X component of the head of a filled vector arrow
drawn at the reference length, as a fraction of reference length. The
X component of the arrowhead is the distance from the point of the
arrowhead to a point along the centerline of the arrow perpendicular
to the arrowhead's rear tips. See VRL for an explanation of how the
reference length is determined. AXR has an effect only when AST is
set to 1. AXR is allowed to vary between 0.0 and 2.0 and its default
value is 0.36.
5.10.11 AYF - Arrow Y-Coord Fractional Minimum - Real
AYF specifies the Y component of the head of a filled vector arrow
drawn at the minimum length, as a fraction of the Y component value of
an arrow drawn at the reference length. The Y component of the
arrowhead is considered to be the perpendicular distance from an edge
parallel to the arrow's centerline to one of the arrowhead's rear
tips. If AYF has the value 0.0, then the ratio of the Y component of
the arrowhead size to the arrow length will be constant for all
vectors in the plot. If given the value 1.0, the arrowhead Y component
will itself be constant for all arrows in the plot, regardless of
length or width. See VFR for a discussion of how the minimum length is
determined. AYF has an effect only when AST is set to 1. AYF is
allowed to vary between 0.0 and 1.0 and its default value is 0.25.
5.10.12 AYR - Arrow Y-Coord Reference Fraction - Real
AYR specifies the Y component of a filled vector arrow drawn at the
reference length, as a fraction of the reference length. The Y
component of the arrowhead is considered to be the perpendicular
distance from an edge parallel to the arrow's centerline to one of the
arrowhead's rear tips. See VRL for an explanation of how the reference
length is determined. AYR has an effect only when AST is set to 1.
AYR is allowed to vary between 0.0 and 1.0 and its default value is
0.12.
5.10.13 CLR - Array of GKS Color Indices - Integer Array
This parameter represents an array containing the GKS color index to
use for coloring the vector when the scalar quantity is less than or
equal to the threshold value with the same index in the TVL threshold
value array. Depending on the settings of AST and ACM it may specify a
set of fill color indexes, a set of line color indexes, or both. In
order to access a particular element of the CLR array, you must first
set the value of PAI, the parameter array index parameter, to the
value of the array element's index. All elements of the array are set
to one initially. Note that the Vectors utility makes no calls to set
the GKS color representation (GSCR), nor ever modifies the contents of
the CLR array; therefore you are responsible for creating a suitably
graduated color palette and assigning the color index values into the
CLR array, prior to calling VVECTR. Typically, assuming the desired
RGB values have been previously stored in a 2-dimensional 3 x n array
called RGB, you loop through the calls that set up the color
representation and color index as in the following example for a
fourteen color palette:
      DO 100 I=1,14,1
        CALL GSCR (1,I,RGB(1,I),RGB(2,I),RGB(3,I))
        CALL VVSETI('PAI -- Parameter Array Index', I)
        CALL VVSETI('CLR -- GKS Color Index', I)
  100 CONTINUE
See the descriptions of CTV, NLV, and TVL for details on configuring
the vector coloring scheme.
5.10.14 CPM - Compatibility Mode - Integer
Controls the degree of compatibility between pre-Version 3.2
capabilities of the Vectors utility and later versions. You can
independently control three behaviors using the nine settings
provided:
- use of VELVCT and VELVEC input parameters
- use of variables initialized in the VELDAT block data statement
- use of the old mapping routines FX, FY, MXF, and MYF.
Note, however, that when using the Version 3.2 entry points VVINIT and
VVECTR, only the third behavior option has any meaning.
When CPM is set to 0, its default value, the Vectors utility's
behavior varies depending on whether the utility has been accessed
through one of the pre-Version 3.2 entry points (VELVCT, VELVEC, and
EZVEC), or through the VVINIT/VVECTR interface. Otherwise, positive
values result in invocation of the pre-Version 3.2 mapping routines
(FX, FY, MXF, and MYF) for the conversion from data to
user coordinates. Negative values cause VVMPXY and perhaps
VVUMXY to be used instead. When using the pre-Version 3.2 interface,
odd values of CPM cause the data values in the VELDAT block data
subroutine to override corresponding values initialized in the Version
3.2 VVDATA block data subroutine, or set by the user calling VVSETx
routines. Values of CPM with absolute value greater than two cause
some of the input arguments to VELVEC and VELVCT to be ignored. These
include FLO, HI, NSET, ISPV, SPV and (for VELVCT only) LENGTH.
Here is a table of the nine settings of CPM and their effect on the
operation of the Vectors utility:
| Value | Use FX, FY, etc. | Use VELDAT data | Use input arguments |
| -4 | no | no | no |
| -3 | no | yes | no |
| -2 | no | no | yes |
| -1 | no | yes | yes |
| 0 | old - yes; new - no (*) | yes | yes |
| 1 | yes | yes | yes |
| 2 | yes | no | yes |
| 3 | yes | yes | no |
| 4 | yes | no | no |
- (*) Old means EZVEC, VELVEC, VELVCT entry point; new,
VVINIT/VVECTR. Only the first column affects the behavior of the
VVINIT/VVECTR interface
5.10.15 CTV - Color Threshold Value Control - Integer
In conjunction with NLV, this parameter controls vector coloring and
the setting of threshold values. The vectors may be colored based on
the vector magnitude or on the contents of a scalar array
(VVINIT/VVECTR input argument, P). A table of supported options
follows:
| Value | Action |
| -2 | Color vector arrows based on scalar array data values; the
user is responsible for setting up threshold level array, TVL |
| -1 | Color vector arrows based on vector magnitude; the user is
responsible for setting up values of threshold level array. |
| 0 (default) | Color all vectors according to the current GKS
polyline color index value. Threshold level array, TVL and GKS color
index array, CLR are not used. |
| 1 | Color vector arrows based on vector magnitude; VVINIT assigns
values to the first NLV elements of the threshold level array,
TVL. |
| 2 | Color vector arrows based on scalar array data values; VVINIT
assigns values to the first NLV elements of the threshold level array,
TVL. |
5.10.16 DMN - NDC Minimum Vector Size - Real, Read-Only
This parameter is read-only and has a useful value only following a
call to VVECTR (directly or through the compatibility version of
VELVCT). It may be retrieved in order to determine the length in NDC
space of the smallest vector actually drawn (in other words, the
smallest vector within the boundary of the user coordinate
space that is greater than or equal in magnitude to the value of the
VLC parameter). It is initially set to a value of 0.0.
5.10.17 DMX - NDC Maximum Vector Size - Real, Read-Only
Unlike DMN this read-only parameter has a potentially useful value
between calls to VVINIT and VVECTR. However, the value it reports may
be different before and after the call to VVECTR. Before the VVECTR
call it contains the length in NDC space that would be used to render
the maximum size vector assuming the user-settable parameter, VRL is
set to its default value of 0.0. After the VVECTR call it contains the
NDC length used to render the largest vector actually drawn (in other
words, the largest vector within the boundary of the user coordinate
space that is less than or equal in magnitude to the value of the VHC
parameter). See the section on the VRL parameter for information on
using the value of DMX after the VVINIT call in order to adjust
proportionally the lengths of all the vectors in the plot. It is
initially set to a value of 0.0.
5.10.18 DPF - Vector Label Decimal Point Control Flag - Integer
If DPF is set to a non-zero value, and the optional vector magnitude
labels are enabled, the magnitude values are scaled to fit in the
range 1 to 999. The labels will contain 1 to 3 digits and no decimal
point. Otherwise, the labels will consist of a number up to six
characters long, including a decimal point. By default DPF is set to
the value 1.
5.10.19 LBC - Vector Label Color - Integer
This parameter specifies the color to use for the optional vector
magnitude labels, as follows:
| Value | Action |
| < -1 | Draw labels using the current GKS text color index |
| -1 (default) | Draw labels using the same color as the
corresponding vector arrow |
| >=0 | Draw labels using the LBC value as the GKS text color
index |
5.10.20 LBL - Vector Label Flag - Integer
If set non-zero, Vectors draws labels representing the vector
magnitude next to each arrow in the field plot. The vector labels are
primarily intended as a debugging aid, since in order to avoid
excessive overlap, you must typically set the label text size too
small to be readable without magnification. For this reason, as well
as for efficiency, unlike the other graphical text elements supported
by the Vectors utility, the vector labels are rendered using low
quality text.
5.10.21 LBS - Vector Label Character Size - Real
This parameter specifies the size of the characters used for the
vector magnitude labels as a fraction of the viewport width. The
default value is 0.007.
5.10.22 LWD - Vector Linewidth - Real
LWD controls the linewidth used to draw the lines that form vector
arrows and wind barbs. When the arrows are filled (AST is set to 1)
LWD controls the width of the arrow's outline. If the fill is drawn
over the outline (AFO set to 1) then LWD must be set to a value
greater than 1.0 in order for the outline to appear properly. When AST
has the value 2, LWD controls the width of the line elements of wind
barbs. When AST is set to 0, specifying line-drawn vector arrows, the
linewidth applies equally to the body of the vector and the
arrowhead. Overly thick lines may cause the arrow heads to appear
smudged. This was part of the motivation for developing the option of
filled vector arrows. Note that since linewidth in NCAR Graphics is
always calculated relative to a unit linewidth that is dependent on
the output device, you may need to adjust the linewidth value
depending on the intended output device to obtain a pleasing plot. The
default is 1.0, specifying a device-dependent minimum linewidth.
5.10.23 MAP - Map Transformation Code - Integer
MAP defines the transformation between the data and
user coordinate space. For a complete explanation of the
various coordinate systems used by the Vectors utility, see Section
2.3, Coordinate Systems in Vectors. Other
relevant information is contained in the discussion of the
user-modifiable mapping subroutine, VVUMXY, and in the discussion of
parameter TRT, Transformation Type. Three MAP parameter codes are
reserved for pre-defined transformations, as follows:
| Value | Mapping transformation |
| 0 (default) | Identity transformation between data and
user coordinates: array indices of U, V, and P are linearly
related to data coordinates. |
| 1 | EZMAP transformation: first dimension indices of U, V, and P
are linearly related to longitude; second dimension indices are
linearly related to latitude. |
| 2 | Polar to rectangular transformation: first dimension indices
of U, V, and P are linearly related to the radius; second dimension
indices are linearly related to the angle in degrees. |
If MAP has any other value, the mapping subroutine VVMPXY, passes its
parameters on to the user-modifiable subroutine, VVUMXY. The default
version of VVUMXY simply performs an identity transformation, without
considering the value of the TRT parameter. The effect is the same as
if one were to set both MAP and TRT to zero. Note that, while not
actually prohibited in the Vectors utility, the user is advised
not to use negative integers for user-defined mappings, since a
negative value results in an inverse transformation in the CONPACK
utility. Inverse transformations are not needed in Vectors but
an inconsistent use of negative mapping codes would likely be
confusing in the long run.
For all the predefined mappings, the linear relationship between the
grid array indices and the data coordinate system is
established using the four parameters XC1, XCM, YC1, and YCN. The X
parameters define a mapping for the first and last indices of the
first dimension of the data arrays, and the Y parameters do the same
for the second dimension. If MAP is set to a value of one, the user
needs to be careful to ensure that the SET parameter is given a value
of zero, since the EZMAP routines call the SET routine to define the
user to NDC mapping. Otherwise, the user may choose
whether or not to issue a SET call prior to calling VVINIT, modifying
the value of SET as required.
5.10.24 MNC - Minimum Vector Text Block Color - Integer
MNC specifies the color of the minimum vector graphical text output
block as follows:
| Value | Action |
| <-2 | Both the vector arrow and the text are colored using the
current text color index. |
| -2 | If the vectors are colored by magnitude, both the vector
arrow and the text use the GKS color index associated with the minimum
vector magnitude. Otherwise, the vector arrow uses the current
polyline color index and the text uses the current text color
index. |
| -1 (default) | If the vectors are colored by magnitude, the
vector arrow uses the GKS color index associated with the minimum
vector magnitude. Otherwise the vector arrow uses the current polyline
color index. The text is colored using the current text color index in
either case. |
| >= 0 | The value of MNC is used as the color index for both
the text and the vector arrow. |
See the description of MNT for more information about the minimum
vector text block.
5.10.25 MNP - Minimum Vector Text Block Positioning Mode - Integer
This parameter allows you to justify the minimum vector text block,
taken as a single unit, relative to the text block position
established by the parameters, MNX and MNY. Nine positioning modes are
available, as follows:
| Mode | Justification |
| -4 | The lower left corner of the text block is positioned at
MNX, MNY. |
| -3 | The center of the bottom edge is positioned at MNX, MNY. |
| -2 | The lower right corner is positioned at MNX, MNY. |
| -1 | The center of the left edge is positioned at MNX, MNY. |
| 0 | The text block is centered along both axes at MNX, MNY. |
| 1 | The center of the right edge is positioned at MNX, MNY. |
| 2 | The top left corner is positioned at MNX, MNY. |
| 3 | The center of the top edge is positioned at MNX, MNY. |
| 4 (default) | The top right corner is positioned at MNX, MNY. |
See the description of MNT for more information about the minimum
vector text block.
5.10.26 MNS - Minimum Vector Text Block Character Size - Real
MNS specifies the size of the characters used in the minimum vector
graphics text block as a fraction of the viewport width. See the
description of MNT for more information about the minimum vector text
block. The default value is 0.0075.
5.10.27 MNT - Minimum Vector Text String - Character* 36
The minimum vector graphics text block consists of a user-definable
text string centered underneath a horizontal arrow. If the parameter
VLC is set negative the arrow is rendered at the size of the reference
minimum magnitude vector (which may be smaller than any vector that
actually appears in the plot). Otherwise, the arrow is the size of the
smallest vector in the plot. Directly above the arrow is a numeric
string in exponential format that represents the vector's
magnitude.
Use MNT to modify the text appearing below the vector in the minimum
vector graphics text block. Currently the string length is limited to
36 characters. Set MNT to a single space (' ') to remove the text
block, including the vector arrow and the numeric magnitude string,
from the plot. The default value is 'Minimum Vector'
5.10.28 MNX - Minimum Vector Text Block X Coordinate - Real
MNX establishes the X coordinate of the minimum vector graphics text
block as a fraction of the viewport width. Values less than 0.0 or
greater than 1.0 are permissible and respectively represent regions to
the left or right of the viewport. The actual position of the block
relative to MNX depends on the value assigned to MNP. See the
descriptions of MNT and MNP for more information about the minimum
vector text block. The default value of MNX is 0.475.
5.10.29 MNY - Minimum Vector Text Block Y Coordinate - Real
MNY establishes the Y coordinate of the minimum vector graphics text
block as a fraction of the viewport height. Values less than 0.0 or
greater than 1.0 are permissible and respectively represent regions
below or above the viewport. The actual position of the block relative
to MNY depends on the value assigned to MNP. The default value is
-0.01.
5.10.30 MSK - Mask To Area Map Flag - Integer
Use this parameter to control masking of vectors to an existing area
map created by routines in the Areas utility. When MSK is
greater than 0, masking is enabled and an the area map must be set up
prior to the call to VVECTR. The area map array and, in addition, the
name of a user-definable masked drawing routine, must be passed as
input parameters to VVECTR. Various values of the MSK parameter have
the following effects:
| Value | Effect |
| <= 0 (default) | No masking of vectors. |
| 1 | The subroutine ARDRLN is called internally to decompose the
vectors into segments contained entirely within a single area. ARDRLN
calls the user-definable masked drawing subroutine. |
| >1 | Low precision masking. ARGTAI is called internally to get
the area identifiers for the vector base position point. Then the
user-definable masked drawing subroutine is called to draw the
vector. Vectors with nearby base points may encroach into the intended
mask area. |
See the discussion of the default version of the user-definable
subroutine, VVUDMV, for further explanation of masked drawing of
vectors
5.10.31 MXC - Maximum Vector Text Block Color - Integer
MXC specifies the color of the maximum vector graphical text output
block as follows:
| Value | Action |
| <-2 | Both the vector arrow and the text are colored using the
current text color index. |
| -2 | If the vectors are colored by magnitude, both the vector
arrow and the text use the GKS color index associated with the minimum
vector magnitude. Otherwise, the vector arrow uses the current
polyline color index and the text uses the current text color
index. |
| -1 (default) | If the vectors are colored by magnitude, the
vector arrow uses the GKS color index associated with the minimum
vector magnitude. Otherwise the vector arrow uses the current polyline
color index. The text is colored using the current text color index in
either case. |
| >= 0 | The value of MXC is used as the color index for both
the text and the vector arrow |
See the description of MXT for more information about the maximum
vector text block.
5.10.32 MXP - Maximum Vector Text Block Positioning Mode - Integer
This parameter allows you to justify the maximum vector text block,
taken as a single unit, relative to the text block position
established by the parameters, MXX and MXY. Nine positioning modes are
available, as follows:
| Mode | Justification |
| -4 | The lower left corner of the text block is positioned at
MXX, MXY. |
| -3 | The center of the bottom edge is positioned at MXX, MXY. |
| -2 | The lower right corner is positioned at MXX, MXY. |
| -1 | The center of the left edge is positioned at MXX, MXY. |
| 0 | The text block is centered along both axes at MXX, MXY. |
| 1 | The center of the right edge is positioned at MXX, MXY. |
| 2 (default) | The top left corner is positioned at MXX, MXY. |
| 3 | The center of the top edge is positioned at MXX, MXY. |
| 4 | The top right corner is positioned at MXX, MXY. |
See the description of MXT for more information about the maximum
vector text block.
5.10.33 MXS - Maximum Vector Text Block Character Size - Real
MXS specifies the size of the characters used in the maximum vector
graphics text block as a fraction of the viewport width. See the
description of MXT for more information about the maximum vector text
block. The default value is 0.0075.
5.10.34 MXT - Maximum Vector Text String - Character* 36
The maximum vector graphics text block consists of a user-definable
text string centered underneath a horizontal arrow. If the parameter
VHC is set negative the arrow is rendered at the size of the reference
maximum magnitude vector (which may be larger than any vector that
actually appears in the plot). Otherwise, the arrow is the size of the
largest vector in the plot. Directly above the arrow is a numeric
string in exponential format that represents the magnitude of this
vector.
Use MXT to modify the text appearing below the vector in the maximum
vector graphics text block. Currently the string length is limited to
36 characters. Set MXT to a single space (' ') to completely remove
the text block, including the vector arrow and the numeric magnitude
string, from the plot. Note that the name "Maximum Vector Text Block"
is no longer accurate, since using the parameter VRM it is now
possible to establish a reference magnitude that is smaller than the
maximum magnitude in the data set. A more accurate name would be
"Reference Vector Text Block". The default value of MXT is 'Maximum
Vector'.
5.10.35 MXX - Maximum Vector Text Block X Coordinate - Real
MXX establishes the X coordinate of the maximum vector graphics text
block as a fraction of the viewport width. Values less than 0.0 or
greater than 1.0 are permissible and respectively represent regions
left or right of the viewport. The actual position of the block
relative to MXX depends on the value assigned to MXP. See the
descriptions of MXT and MXP for more information about the maximum
vector text block. The default value is 0.525.
5.10.36 MXY - Maximum Vector Text Block Y Coordinate - Real
MXY establishes the Y coordinate of the maximum vector graphics text
block as a fraction of the viewport width. Values less than 0.0 or
greater than 1.0 are permissible and respectively represent regions
below or above the viewport. The actual position of the block relative
to MXY depends on the value assigned to MXP. See the descriptions of
MXT and MXP for more information about the maximum vector text
block. The default value is -0.01.
5.10.37 NLV - Number of Color Levels - Integer
NLV specifies the number of color levels to use when coloring the
vectors according to data in a scalar array or by vector
magnitude. Any time CTV has a non-zero value, you must set up the
first NLV elements of the color index array CLR. Give each element the
value of a GKS color index that must be defined by a call to the GKS
subroutine, GSCR, prior to calling VVECTR. If CTV is less than 0, in
addition to setting up the CLR array, you are also responsible for
setting the first NLV elements of the threshold values array TVL to
appropriate values. Currently NLV is constrained to a maximum value of
255. The default value of NLV is 0, specifying that vectors are
colored according to the value of the GKS polyline color index
currently in effect, regardless of the value of CTV. If CTV is greater
than 0, you must initialize Vectors with a call to VVINIT after
modifying this parameter.
5.10.38 PAI - Parameter Array Index - Integer
The value of PAI must be set before calling VVGETC, VVGETI, VVGETR,
VVSETC, VVSETI, or VVSETR to access any parameter which is an array;
it acts as a subscript to identify the intended array element. For
example, to set the 10th color threshold array element to 7, use code
like this:
      CALL VVSETI ('PAI - PARAMETER ARRAY INDEX',10)
      CALL VVSETI ('CLR - Color Index',7)
The default value of PAI is one.
5.10.39 PLR - Polar Input Mode - Integer
When PLR is greater than zero, the vector component arrays are
considered to contain the field data in polar coordinate form: the U
array is treated as containing the vector magnitude and the V array as
containing the vector angle. Be careful not to confuse the PLR
parameter with the MAP parameter set to polar coordinate mode (2). The
MAP parameter relates to the location of the vector, not its
value. Here is a table of values for PLR:
| Value | Meaning |
| 0 (default) | U and V arrays contain data in cartesian component
form. |
| 1 | U array contains vector magnitudes; V array contains vector
angles in degrees. |
| 2 | U array contain vector magnitudes; V array contains vector
angles in radians. |
5.10.40 PMN - Minimum Scalar Array Value - Real, Read-Only
You may retrieve the value specified by PMN at any time after a call
to VVINIT. It will contain a copy of the minimum value encountered in
the scalar data array. If no scalar data array has been passed into
VVINIT it will have a value of 0.0.
5.10.41 PMX - Maximum Scalar Array Value - Real
You may retrieve the value specified by PMX at any time after a call
to VVINIT. It contains a copy of the maximum value encountered in the
scalar data array. If no scalar data array has been passed into VVINIT
it will have a value of 0.0.
5.10.42 PSV - P Array Special Value - Real
Use PSV to indicate the special value that flags an unknown data value
in the P scalar data array. This value will not be considered in the
determination of the dataset maximum and minimum values. Also,
depending on the setting of the SPC parameter, the vector may be
specially colored to flag the unknown data point, or even eliminated
from the plot.
5.10.43 SET - SET Call Flag - Integer
Give SET the value 0 to inhibit the SET call otherwise performed by
VVINIT. Arguments 5-8 of a SET call done by the user must be
consistent with the ranges of the user coordinates expected
by Vectors. This is determined by the mapping from grid to
data coordinates as specified by the values of the parameters
XC1, XCM, YC1, YCN, and also by the mapping from data to
user coordinates established by the MAP parameter. See the
descriptions of these parameters and the section, Coordinate Systems in Vectors. The default
value of SET is 1.
5.10.44 SPC - Special Color - Integer
SPC controls special value processing for the optional scalar data
array used to color the vectors, as follows:
| Value | Effect |
| < 0 (default) | The P scalar data array is not examined for
special values. |
| 0 | Vectors at P scalar array special value locations are not
drawn. |
| > 0 | Vectors at P scalar array special value locations are
drawn using color index SPC. |
5.10.45 SVF - Special Value Flag - Integer
The special value flag controls special value processing for the U and
V vector component data arrays. Special values may appear in either
the U or V array or in both of them. Five different options are
available (although the usefulness of some of the choices is
debatable):
| Value | Effect |
| 0 (default) | Neither the U nor the V array is examined for
special values |
| 1 | Vectors with special values in the U array are not drawn |
| 2 | Vectors with special values in the V array are not drawn |
| 3 | Vectors with special values in either the U or V array are
not drawn |
| 4 | Vectors with special values in both the U and V arrays are
not drawn |
The U and V special values are defined by setting parameters USV and VSV.
5.10.46 TRT - Transformation Type - Integer
As currently implemented, TRT further qualifies the mapping
transformation specified by the MAP parameter, as follows:
| Value | Effect |
| -1 | Direction, magnitude, and location are all transformed. This
option is not currently supported by any of the pre-defined coordinate
system mappings. |
| 0 | Only location is transformed |
| 1 (default) | Direction and location are transformed |
This parameter allows you to distinguish between a system that
provides a mapping of location only into an essentially cartesian
space, and one in which the space itself is mapped. To understand the
difference, using polar coordinates as an example, imagine a set of
wind speed monitoring units located on a radial grid around some
central point such as an airport control tower. Each unit's position
is defined in terms of its distance from the tower and its angular
direction from due east. However, the data collected by each
monitoring unit is represented as conventional eastward and northward
wind components. Assuming the towers' location is at a moderate
latitude, and the monitoring units are reasonably 'local', this is an
example of mapping a radially defined location into a nearly cartesian
space (i.e. the eastward components taken alone all point in a single
direction on the plot, outlining a series of parallel straight
lines). One would set MAP to two (for the polar transformation) and
TRT to zero to model this data on a plot generated by the
Vectors utility.
On the other hand, picture a set of wind data, again given as eastward
and northward wind components, but this time the center of the polar
map is actually the south pole. In this case, the eastward components
do not point in a single direction; instead they outline a series of
circles around the pole. This is a space mapping transformation: one
would again set MAP to two, but TRT would be set to one to transform
both direction and location.
Changing the setting of this parameter affects the end results only
when a non-uniform non-linear mapping occurs at some point in the
transformation pipeline. For this discussion a uniform linear
transformation is defined as one which satisfies the following
equations:
      Xout = Xoffset + Scaleconstant * Xin
      Yout = Yoffset + Scaleconstant * Yin
If Scaleconstant is not the same for both the X axis and the
Y axis then the mapping is non-uniform.
This option is currently implemented only for the pre-defined MAP parameter codes, 0 and 2, the identity
mapping and the polar coordinate mapping. However, it operates on a
different stage of the transformation pipeline in each case. The polar
mapping is non-linear from data to user
coordinates. The identity mapping, even though necessarily linear over
the data to user space mapping, can have a
non-uniform mapping from user to NDC space,
depending on the values given to the input parameters of the SET
call. This will be the case whenever the LL input parameter is other
than one, or when LL equals one, but the viewport and the user
coordinate boundaries do not have the same aspect ratio. Thus for a MAP value of 2, TRT affects the mapping
between data and user space, whereas for MAP set to 0, TRT influences the mapping
between user and NDC space.
5.10.47 TVL - Array of Threshold Values - Real Array
TVL is an array of threshold values that is used to determine the
individual vector color, when CTV and NLV are both non-zero. For each
vector the TVL array is searched for the smallest value greater than
or equal to the scalar value associated with the vector. The array
subscript of this element is used as an index into the CLR
array. Vectors uses the GKS color index found at this element of the
CLR array to set the color for the vector. Note that Vectors assumes
that the threshold values are monotonically increasing.
When CTV is less than 0, you are responsible for assigning values to
the elements of TVL yourself. To do this, first set the PAI parameter
to the index of the threshold level element you want to define, then
call VVSETR to set TVL to the appropriate threshold value for this
element. Assuming the desired values have previously been stored in a
array named TVALS, you could assign the threshold values for a
fourteen level color palette using the following loop:
      DO 100 I=1,14,1
        CALL VVSETI(PAI -- Parameter Array Index, I)
        CALL VVSETR(TVL -- Threshold Value, TVALS(I))
  100 CONTINUE
When CTV is greater than 0, Vectors assigns values into TVL
itself. Each succeeding element value is greater than the preceding
value by the value of the expression:
(maximum_data_value - minimum_data_value) / NLV
where the data values are either from the scalar data array or are the
magnitudes of the vectors in the vector component arrays. The first
value is equal to the minimum value plus the expression; the final
value (indexed by the value of NLV) is equal to the maximum value. If
Vectors encounters a value greater than the maximum value in the TVL
array while processing the field data, it gives the affected vector
the color associated with the maximum TVL value.
5.10.48 USV - U Array Special Value - Real
USV is the U vector component array special value. It is a value
outside the range of the normal data and is used to indicate that
there is no valid data for this grid location. When SVF is set to 1 or
3, Vectors will not draw a vector whose U component has the
special value. It has a default value of 1.0 E12.
5.10.49 VFR - Minimum Vector Fractional Length - Real
Use this parameter to adjust the realized size of the reference
minimum magnitude vector relative to the reference maximum magnitude
vector in order to improve the appearance or perhaps the information
content of the plot. Specify VFR as a value between 0.0 and 1.0, where
0.0 represents an unmodified linear scaling of the realized vector
length, in proportion to magnitude, and 1.0 specifies that the
smallest vector be represented at 1.0 times the length of the largest
vector, resulting in all vectors, regardless of magnitude, having the
same length on the plot. A value of 0.5 means that the smallest
magnitude vector appears half as long as the largest magnitude vector;
intermediate sizes are proportionally scaled to lengths between these
extremes. Where there is a wide variation in magnitude within the
vector field, you can use this parameter to increase the size of the
smallest vectors to a usefully visible level. Where the variation is
small, you can use the parameter to exaggerate the differences that do
exist. See also the descriptions of VRL, VLC, VHC, and VRM. The
default value is 0.0.
5.10.50 VHC - Vector High Cutoff Value - Real
If the parameter VRM is set to a value greater than 0.0, it supercedes
the use of VHC to specify the reference magnitude. VRM allows greater
flexibility in that it can be used to specify an arbitrary reference
magnitude that need not be the maximum magnitude contained in the data
set. VHC can still be used to set a high cutoff value -- no vectors
with magnitude greater than the cutoff value will be displayed in the
plot.
If VRM has its default value, 0.0, VHC specifies the reference maximum
magnitude represented by an arrow of length VRL (as a fraction of the
viewport width). The realized length of each individual vector in the
plot is based on its magnitude relative to the reference maximum
magnitude and, if VFR is non-zero, the reference minimum magnitude (as
specified by VLC). Note that the reference maximum magnitude may be
greater than the magnitude of any vector in the dataset. The effect of
this parameter varies depending on its value, as follows:
| Value | Effect |
| < 0.0 | The absolute value of VHC unconditionally determines
the reference maximum magnitude. Vectors in the dataset with magnitude
greater than VHC are not displayed. |
| 0.0 (default) | The vector with the greatest magnitude in the
dataset determines the reference maximum magnitude. |
| >0.0 | The minimum of VHC and the vector with the greatest
magnitude in the data set determines the reference maximum
magnitude. Vectors in the dataset with magnitude greater than VHC are
not displayed. |
Typically, for direct comparison of the output of a series of plots,
you would set VHC to a negative number, the absolute value of which is
greater than any expected vector magnitude in the series. You can turn
on Vectors statistics reporting using the parameter VST in order to
see if any vectors in the datasets do exceed the maximum magnitude you
have specified. See also the descriptions of the parameters VRM, VRL,
DMX, VLC, and VFR.
5.10.51 VLC - Vector Low Cutoff Value - Real
Use this parameter to prevent vectors smaller than the specified
magnitude from appearing in the output plot. VLC also specifies the
reference minimum magnitude that is rendered at the size specified by
the product of VRL and VFR (as a fraction of the viewport width), when
VFR is greater than 0.0. Note that the reference minimum magnitude may
be smaller than the magnitude of any vector in the dataset. The effect
of this parameter varies depending on its value, as follows:
| Value | Effect |
| < 0.0 | The absolute value of VLC unconditionally determines
the reference minimum magnitude. Vectors in the dataset with magnitude
less than VLC are not displayed. |
| 0.0 (default) | The vector with the least magnitude in the
dataset determines the reference minimum magnitude. |
| >0.0 | The maximum of VLC and the vector with the least
magnitude in the data set determines the reference minimum
magnitude. Vectors in the dataset with magnitude less than VLC are not
displayed. |
The initialization subroutine, VVINIT, calculates the magnitude of all
the vectors in the vector field, and stores the maximum and minimum
values. The user may access these values by retrieving the read-only
parameters, VMX and VMN. Thus it is possible to remove the small
vectors without prior knowledge of the data domain. The following code
fragment illustrates how the smallest 10% of the vectors could be
removed:
      CALL VVINIT(...
      CALL VVGETR('VMX - Vector Maximum Magnitude', VMX)
      CALL VVGETR('VMN - Vector Minimum Magnitude', VMN)
      CALL VVSETR('VLC - Vector Low Cutoff Value', VMN+0.1*(VMX-VMN))
      CALL VVECTR(...
On the other hand, when creating a series of plots that you would like
to compare directly and you are using VFR to set a minimum realized
size for the vectors, you can ensure that all vectors of a particular
length represent the same magnitude on all the plots by setting both
VHC and VLC to negative values. If you do not actually want to remove
any vectors from the plot, make VLC smaller in absolute value than any
expected magnitude. You can turn on Vectors statistics reporting using
the parameter VST in order to see if any vectors in the datasets are
less the minimum magnitude you have specified. See also the
descriptions of parameters VFR, VRL, VRM, VHC and DMN.
5.10.52 VMD - Vector Minimum Distance - Real
If VMD is set to a value greater than 0.0, it specifies, as a fraction
of the viewport width, a minimum distance between adjacent vectors in
the plot. The distribution of vectors is analyzed and then vectors are
selectively removed in order to ensure that the remaining vectors are
separated by at least the specified distance. The thinning algorithm
requires that you supply Vectors with a work array twice the size of
the VVINIT arguments N and M multiplied together. Use of this
capability adds some processing time to the execution of Vectors. If
VMD is set to a value greater than 0.0 and no work array is provided,
an error condition results.
If the data grid is transformed in such a way that adjacent grid cells
become very close in NDC space, as for instance in many map
projections near the poles, you can use this parameter to reduce the
otherwise cluttered appearance of these regions of the plot. The
default value of VMD is 0.0.
5.10.53 VMN - Minimum Vector Magnitude - Real, Read-Only
After a call to VVINIT, VMN contains the value of the minimum vector
magnitude in the U and V vector component arrays. Later, after VVECTR
is called, it is modified to contain the magnitude of the smallest
vector actually displayed in the plot. This is the vector with the
smallest magnitude greater than or equal to the value specified by
VLC, the vector low cutoff parameter, (0.0 if VLC has its default
value) that falls within the user coordinate window boundaries. The
value contained in VMN is the same as that reported as the 'Minimum
plotted vector magnitude' when Vectors statistics reporting is
enabled. It may be larger than the reference minimum magnitude
reported by the minimum vector text block if you specify the VLC
parameter as a negative value. VMN is initially set to a value of
0.0.
5.10.54 VMX - Maximum Vector Magnitude - Real, Read-Only
After a call to VVINIT, VMX contains the value of the maximum vector
magnitude in the U and V vector component arrays. Later, after VVECTR
is called, it is modified to contain the magnitude of the largest
vector actually displayed in the plot. This is the vector with the
largest magnitude less than or equal to the value specified by VHC,
the vector high cutoff parameter, (the largest floating point value
available on the machine if VHC has its default value, 0.0) that falls
within the user coordinate window boundaries. The value contained in
VMX is the same as that reported as the 'Maximum plotted vector
magnitude' when Vectors statistics reporting is enabled. It may be
smaller than the reference maximum magnitude reported by the maximum
vector text block if you specify the VHC parameter as a negative
value. VMX is initially set to a value of 0.0.
5.10.55 VPB - Viewport Bottom - Real
The parameter VPB has an effect only when SET is non-zero, specifying
that Vectors should do the call to SET. It specifies a minimum
boundary value for the bottom edge of the viewport in NDC space, and
is constrained to a value between 0.0 and 1.0. It must be less than
the value of the Viewport Top parameter, VPT. The actual value of the
viewport bottom edge used in the plot may be greater than the value of
VPB, depending on the setting of the Viewport Shape parameter,
VPS. The default value of VPB is 0.05.
5.10.56 VPL - Viewport Left - Real
The parameter VPL has an effect only when SET is non-zero, specifying
that Vectors should do the call to SET. It specifies a minimum
boundary value for the left edge of the viewport in NDC space, and is
constrained to a value between 0.0 and 1.0. It must be less than the
value of the Viewport Right parameter, VPR. The actual value of the
viewport left edge used in the plot may be greater than the value of
VPL, depending on the setting of the Viewport Shape parameter,
VPS. The default value of VPL is 0.05.
5.10.57 VPO - Vector Positioning Mode - Integer
VPO specifies the position of the vector arrow in relation to the grid
point location of the vector component data. Three settings are
available, as follows:
| Value | Effect |
| <0 | The head of the vector arrow is placed at the grid point
location |
| 0 (default) | The center of the vector arrow is placed at the
grid point location |
| >0 | The tail of the vector arrow is placed at the grid point
location |
5.10.58 VPR- Viewport Right - Real
The parameter VPR has an effect only when SET is non-zero, specifying
that Vectors should do the call to SET. It specifies a maximum
boundary value for the right edge of the viewport in NDC space, and is
constrained to a value between 0.0 and 1.0. It must be greater than
the value of the Viewport Left parameter, VPL. The actual value of the
viewport right edge used in the plot may be less than the value of
VPR, depending on the setting of the Viewport Shape parameter,
VPS. The default value of VPR is 0.95.
5.10.59 VPS - Viewport Shape - Real
The parameter VPS has an effect only when SET is non-zero, specifying
that Vectors should do the call to SET; it specifies the
desired viewport shape, as follows:
| Value | Effect |
| <0.0 | The absolute value of VPS specifies the viewport shape
as a ratio of the viewport width to its height. |
| 0.0 | The viewport completely fills the area defined by the
boundaries specifiers, VPL, VPR, VPB, VPT |
| >0.0, <1.0 (0.25, default) | Use R = (XCM-XC1)/(YCN-YC1)
as the viewport shape if MIN(R, 1.0/R) is greater than VPS. Otherwise
determine the shape as when VPS is equal to 0.0. |
| >= 1.0 | Use R = (XCM-XC1)/(YCN-YC1) as the viewport shape if
MAX(R, 1.0/R) is less than VPS. Otherwise make the viewport a
square. |
The viewport, whatever its final shape, is centered in, and made as
large as possible in, the area specified by the parameters VPB, VPL,
VPR, and VPT. The default value of VPS is 25.
5.10.60 VPT - Viewport Top - Real
The parameter VPT has an effect only when SET is non-zero, specifying
that Vectors should do the call to SET. It specifies a maximum
boundary value for the top edge of the viewport in NDC space, and is
constrained to a value between 0.0 and 1.0. It must be greater than
the value of the Viewport Bottom parameter, VPB. The actual value of
the viewport top edge used in the plot may be less than the value of
VPT, depending on the setting of the Viewport Shape parameter,
VPS. The default value of VPT is 0.95.
5.10.61 VRL - Vector Reference Length - Real
Use this parameter to specify the realized length of the reference
magnitude vector as a fraction of the viewport width. Based on this
value a reference length in NDC units is established, from which the
lengths of all vectors in the plot are derived. The relationship
between magnitude and length also depends on the setting of the
minimum vector magnitude fraction parameter, VFR, but, given the
default value of VFR (0.0), the length of each vector is simply
proportional to its relative magnitude. Note that the arrow size
parameters, AMN and AMX, allow independent control over the minimum
and maximum size of the vector arrowheads.
Given a reference length, Vectors calculates a maximum length based on
the ratio of the reference magnitude to the larger of the maximum
magnitude in the data set and the reference magnitude itself. This
length is accessible in units of NDC via the read-only parameter,
DMX. If VRL is set less than or equal to 0.0, VVINIT calculates a
default value for DMX, based on the size of a grid box assuming a
linear mapping from grid coordinates to NDC space. The value chosen is
one half the diagonal length of a grid box. By retrieving the value of
DMX and calling GETSET to retrieve the viewport boundaries after the
call to VVINIT, you can make relative adjustments to the vector
length, as shown by the following example, where the maximum vector
length is set to 1.5 times its default value:
      CALL VVINIT(...
      CALL VVGETR('DMX - NDC Maximum Vector Size', DMX)
      CALL GETSET(VL,VR,VB,VT,UL,UR,UB,UT,LL)
      VRL = 1.5 * DMX / (VR - VL)
      CALL VVSETR('VRL - Vector Reference Length', VRL)
      CALL VVECTR(...
When VVECTR sees that VRL is greater than 0.0, it will calculate a new
value for DMX. If VRL is never set, the initially calculated value of
DMX is used as the reference length. Do not rely on the internal
parameters used for setting the viewport, VPL, VPR, VPB and VPT to
retrieve information about viewport in lieu of using the GETSET
call. These values are ignored entirely if the SET parameter is zero,
and even if used, the viewport may be adjusted from the specified
values depending on the setting of the viewport shape parameter,
VPS. See also the descriptions of VFR, VRM and VHC. The default value
of VRL is 0.0.
5.10.62 VRM - Vector Reference Magnitude - Real
The introduction of the parameter VRM means that it is now possible to
specify an arbitrary vector magnitude as the reference magnitude
appearing in the "Maximum Vector Text Block" annotation. The reference
magnitude no longer needs to be greater than or equal to the largest
magnitude in the data set. When VRM has a value greater than 0.0, it
specifies the magnitude of the vector arrow drawn at the reference
length. See VRL for an explanation of how the reference length is
determined. If VRM is less than or equal to 0.0, the reference
magnitude is determined by the value of VHC, the vector high cutoff
value. If, in turn, VHC is equal to 0.0 the maximum magnitude in the
vector field data set becomes the reference magnitude. The default
value of VRM is 0.0.
5.10.63 VST - Vector Statistics Output Flag -Integer
If VST is set to one, VVECTR writes a summary of its operation to the
default logical output unit, including the number of vectors plotted,
number of vectors rejected, minimum and maximum vector magnitudes, and
if coloring the vectors according to data in the scalar array, the
maximum and minimum scalar array values encountered. Here is a sample
of the output:
VVECTR Statistics
                        Vectors plotted: 906
    Vectors rejected by mapping routine: 0
        Vectors under minimum magnitude: 121
         Vectors over maximum magnitude: 0
              Other zero length vectors: 0
                Rejected special values: 62
       Minimum plotted vector magnitude: 9.94109E-02
       Maximum plotted vector magnitude: 1.96367
                   Minimum scalar value: -1.00000
                   Maximum scalar value: 1.00000
5.10.64 VSV - V Array Special Value - Real
VSV is the V vector component array special value. It is a value
outside the range of the normal data and is used to indicate that
there is no valid data for this grid location. When SVF is set to 2 or
3, Vectors will not draw a vector whose V component has the
special value. It has a default value of 1.0 E12.
5.10.65 WBA - Wind Barb Angle - Real
WBA sets the angle of the wind barb ticks in degrees as
measured clockwise from the vector direction. It also sets the angle
between the hypotenuse of the triangle defining the pennant polygon
and the vector direction. You can render southern hemisphere wind
barbs, which by convention, have their ticks and pennants on the other
side of the shaft, by setting WBA to a negative value. WBA
has an effect only when AST has the value 2.
5.10.65 WBC - Wind Barb Calm Circle Size - Real
WBC sets the diameter of the circle used to represent small vector
magnitudes (less than 2.5) as a fraction of the overall wind barb
length (the value of the VRL
parameter). WBC has an effect only when AST has the value 2.
5.10.65 WBD - Wind Barb Distance Between Ticks - Real
WBD sets the distance between adjacent wind barbs ticks along the wind
barb shaft as a fraction of the overall wind barb length (the value of
the VRL parameter). Half this distance is
used as the spacing between adjacent wind barb pennants. Note that
there is nothing to to prevent ticks and/or pennants from continuing
off the end of the shaft if a vector of high enough magnitude is
encountered. You are responsible for adjusting the parameters
appropriately for the range of magnitudes you need to handle. WBD has
an effect only when AST has the value 2.
5.10.65 WBS - Wind Barb Scale Factor - Real
WBS specifies a factor by which magnitudes passed to the wind barb
drawing routines are to be scaled. It can be used to convert vector
data given in other units into the conventional units used with wind
barbs, which is knots. For instance, if the data are in meters per second,
you could set WBS to 1.8974 to create a plot with conventional knot-based
wind barbs. Note that setting WBS does not currently have any effect on
the magnitude values written into the maximum or minimum vector legends.
WBS has an effect only when AST has the value 2.
5.10.65 WBT - Wind Barb Tick Size - Real
WBT the length of the wind barb ticks as a fraction of the overall
length of a wind barb (the value of the VRL parameter). The wind barb
length is defined as the length of the wind barb shaft plus the
projection of a full wind barb tick along the axis of the
shaft. Therefore, increasing the value of WBT, for a given value of VRL
has the effect of reducing the length of the shaft itself
somewhat. You may need to increase VRL itself to compensate. WBT
also sets the hypotenuse length of the triangle defining the
pennant polygon. WBT has an effect only when AST has the value 2.
5.10.65 WDB - Window Bottom - Real
When VVINIT does the call to SET, the parameter WDB is used to
determine argument number 7, the user Y coordinate at the
bottom of the window. If WDB is not equal to WDT, WDB is used. If WDB
is equal to WDT, but YC1 is not equal to YCN, then YC1 is
used. Otherwise, the value 1.0 is used. The default value of WDB is
0.0.
5.10.66 WDL - Window Left - Real
When VVINIT does the call to SET, the parameter WDL is used to
determine argument number 5, the user X coordinate at the left
edge of the window. If WDL is not equal to WDR, WDL is used. If WDL is
equal to WDR, but XC1 is not equal to XCM, then XC1 is
used. Otherwise, the value 1.0 is used. The default value of WDL is
0.0.
5.10.67 WDR - Window Right - Real
When VVINIT does the call to SET, the parameter WDR is used to
determine argument number 6, the user X coordinate at the right
edge of the window. If WDR is not equal to WDL, WDR is used. If WDR is
equal to WDL, but XCM is not equal to XC1, then XCM is
used. Otherwise, the value of the VVINIT input parameter, M, converted
to a real, is used. The default value of WDR is 0.0.
5.10.68 WDT - Window Top - Real
When VVINIT does the call to SET, the parameter WDT is used to
determine argument number 8, the user Y coordinate at the top
of the window. If WDT is not equal to WDB, WDT is used. If WDT is
equal to WDB, but YCN is not equal to YC1 then YCN is used. Otherwise,
the value of the VVINIT input parameter, N, converted to a real, is
used. The default value of WDT is 0.0.
5.10.69 XC1 - X Coordinate at Index 1 - Real
The parameter XC1 specifies the X coordinate value that corresponds to
a value of 1 for the first subscript of the U, V, vector component
arrays as well as for the P scalar data array, if used. Together with
XCM, YC1, and YCN it establishes the mapping from grid
coordinate space to data coordinate space. If XC1 is equal to
XCM, 1.0 will be used. The default value of XC1 is 0.0.
5.10.70 XCM - X Coordinate at Index M - Real
The parameter XCM specifies the X coordinate value that corresponds to
the value of the VVINIT input parameter, M, for the first subscript of
the U and V vector component arrays as well as for the P scalar data
array, if used. Together with XC1, YC1, and YCN it establishes the
mapping from grid coordinate space to data coordinate
space. If XC1 is equal to XCM, the value of M, converted to a real,
will be used. The default value of XCM is 0.0.
5.10.71 XIN - X Axis Array Increment (Grid) - Integer
XIN controls the step size through first dimensional subscripts of the
U,V vector component arrays and also through the P scalar data array
if it is used. For dense arrays plotted at a small scale, you could
set this parameter to a value greater than one to reduce the crowding
of the vectors and hopefully improve the intelligibility of the
plot. The grid point with subscripts (1,1) is always included in the
plot, so if XIN has a value of three, for example, only grid points
with first dimension subscripts 1, 4, 7... (and so on) will be
plotted. See also YIN. The default value of XIN is 1.
5.10.72 YC1 - Y Coordinate at Index 1 - Real
The parameter YC1 specifies the Y coordinate value that corresponds to
a value of 1 for the first subscript of the U, V, vector component
arrays as well as for the P scalar data array, if used. Together with
YCN, XC1, and XCM it establishes the mapping from grid
coordinate space to data coordinate space. If YC1 is equal to
YCN, 1.0 will be used. The default value of YC1 is 0.0.
5.10.73 YCN - Y Coordinate at Index N - Real
The parameter YCN specifies the Y coordinate value that corresponds to
the value of the VVINIT input parameter, N, for the second subscript
of the U and V vector component arrays as well as the P scalar data
array, if used. Together with YC1, XC1, and XCM it establishes the
mapping from grid coordinate space to data coordinate
space. If YC1 is equal to YCN, the value of N, converted to a real,
will be used. The default value of YCN is 0.0
5.10.74 YIN - Y Axis Array Increment (Grid) - Integer
YIN controls the step size through the second dimension subscripts of
the U and V vector component arrays and also through the P scalar data
array if it is used. For dense arrays plotted at a small scale, you
could set this parameter to a value greater than one to reduce the
crowding of the vectors and hopefully improve the intelligibility of
the plot. The grid point with subscripts (1,1) is always included in
the plot, so if YIN has a value of three, for example, only grid
points with second dimension subscripts 1, 4, 7... (and so on) will be
plotted. See also XIN. The default value of YIN is 1.
5.10.75 ZFC - Zero Field Text Block Color - Integer
If ZFC is greater or equal to zero, it specifies the GKS color index
to use to color the Zero Field text block. Otherwise the Zero Field
text block is colored using the current GKS text color index. The
default value of ZFC is -1.
5.10.76 ZFP - Zero Field Text Block Positioning Mode - Integer
The ZFP parameter allows you to justify, using any of the 9 standard
justification modes, the Zero Field text block unit with respect to
the position established by the parameters, ZFX and ZFY. The position
modes are supported as follows:
| Mode | Justification |
| -4 | The lower left corner of the text block is positioned at
ZFX, ZFY. |
| -3 | The center of the bottom edge is positioned at ZFX, ZFY. |
| -2 | The lower right corner is positioned at ZFX, ZFY. |
| -1 | The center of the left edge is positioned at ZFX, ZFY. |
| 0 (default) | The text block is centered along both axes at ZFX, ZFY. |
| 1 | The center of the right edge is positioned at ZFX, ZFY. |
| 2 | The top left corner is positioned at ZFX, ZFY. |
| 3 | The center of the top edge is positioned at ZFX, ZFY. |
| 4 | The top right corner is positioned at ZFX, ZFY. |
5.10.77 ZFS - Zero Field Text Block Character Size - Real
ZFS specifies the size of the characters used in the Zero Field
graphics text block as a fraction of the viewport width. The default
value is 0.033.
5.10.78 ZFT - Zero Field Text String - Character* 36
Use ZFT to modify the text of the Zero Field text block. The Zero
Field text block may appear whenever the U and V vector component
arrays contain data such that all the grid points otherwise eligible
for plotting contain zero magnitude vectors. Currently the string
length is limited to 36 characters. Set ZFT to a single space (' ') to
prevent the text from being displayed. The default value for the text
is 'Zero Field'.
5.10.79 ZFX - Zero Field Text Block X Coordinate - Real
ZFX establishes the X coordinate of the Zero Field graphics text block
as a fraction of the viewport width. Values less than 0.0 or greater
than 1.0 are permissible and respectively represent regions to the
left or right of the viewport. The actual position of the block
relative to ZFX depends on the value assigned to the Zero Field
Positioning Mode parameter, ZFP. The default value is 0.5.
5.10.80 ZFY - Zero Field Text Block Y Coordinate - Real
ZFY establishes the Y coordinate of the Zero Field graphics text block
as a fraction of the viewport height. Values less than 0.0 or greater
than 1.0 are permissible and respectively represent regions below and
above the viewport. The actual position of the block relative to ZFY
depends on the value assigned to the Zero Field Positioning Mode
parameter, ZFP. The default value is 0.5.
6.0 ERROR MESSAGES
In this section are listed, in alphabetical order, all the error
messages that may be written by Vectors. Each error message
begins with the name of the Vectors routine in which an error
has been detected, followed by a dash, followed by the error message
itself. These error messages are written by a call to the
error-handling support routine SETER, with a final argument indicating
that the error is recoverable; by default, an error message is printed
and execution is terminated, but, if you turn on error recovery (as
described in the documentation for SETER, you can get control back.
VVECTR - TOO MANY AREA GROUPS
The area map passed as the argument, IAM, to VVECTR contains more area
groups than allowed by the Vectors utility, currently 64. This
error can occur only if the Mask to Area Map parameter, MSK, has a
value greater than 0, specifying that vectors are to be drawn masked
to an area map.
VVECTR - INVALID AREA MAP
The area map passed as the argument, IAM, to VVECTR is judged to be
invalid because it contains a negative value for the number of area
groups. This error can occur only if the Mask to Area Map parameter,
MSK, has a value greater than 0, specifying that vectors are to be
drawn masked to an area map.
VVGETC - PARAMETER NAME NOT KNOWN - x
The given parameter name ('x') is not a legal parameter name known to
Vectors.
VVGETC - PARAMETER NAME TOO SHORT - x
The parameter name ("x") is less than three characters long.
VVGETI OR VVGETR - GETTING x - PAI INCORRECT
An attempt has been made to get an element of the parameter array
named 'x' and the current value of PAI (the "parameter array index")
is inappropriate for that parameter array.
VVGETI OR VVGETR - PARAMETER NAME NOT KNOWN - x
The given parameter name ('x') is not a legal parameter name known to
Vectors.
VVGETI OR VVGETR - PARAMETER NAME TOO SHORT - x
The parameter name ("x") is less than three characters long.
VVINIT - U AND/OR V ARRAY DIMENSIONS EXCEEDED
The VVINIT input argument, M, specifying the number of array elements
to use along the first dimension of the U and V (and possibly P)
arrays, exceeds the actual first dimension of U and/or V, as specified
by the input arguments LU and LV.
VVINIT - SCALAR ARRAY TOO SMALL
The value given to LP, the VVINIT input argument specifying the actual
first dimension of the scalar data array, P, is less than M, the input
argument specifying the number of array elements to use along the
first dimension for all of the input arrays. This error can only occur
when the absolute value of the Color Threshold Level control
parameter, CTV, is set to 2, indicating that coloring is to be
performed according to values contained in the scalar data array,
P.
VVSETC - PARAMETER NAME NOT KNOWN - x
The given parameter name ('x') is not a legal parameter name known to
Vectors.
VVSETC - PARAMETER NAME TOO SHORT - x
The parameter name ("x") is less than three characters long.
VVSETI OR VVSETR - PARAMETER NAME NOT KNOWN - x
The given parameter name ('x') is not a legal parameter name known to
Vectors.
VVSETI OR VVSETR - PARAMETER NAME TOO SHORT - x
The parameter name ("x") is less than three characters long.
VVSETI OR VVSETR - PARAMETER VALUE OUT OF RANGE - x
An attempt has been made to set the parameter named 'x' to a value
outside the range allowed by the Vectors utility.
VVSETI OR VVSETR - SETTING x - PAI INCORRECT
An attempt has been made to set an element of the parameter array
named 'x' and the current value of PAI (the "parameter array index")
is inappropriate for that parameter array.
7.0 EXAMPLES
On a Unix system on which NCAR Graphics has been installed you may
retrieve, compile, and execute all examples involving the
Vectors utility by executing the command
ncargex -vectors
Alternatively, you can obtain and run a specific example by giving the
command
ncargex example_name
To obtain the code without compiling or executing it, use the
command
ncargex -n example_name
If, after examining the code and perhaps modifying it, you wish to
compile and execute the program, use the commands
    ncargf77 -o example_name *.f
    ./example_name
(Note that the form of the above command assumes you have the source
for only one example in the current directory.) The metafile created
by executing an example can be viewed using the command
ctrans metafile_name
7.1 tvelvc
The example "tvelvc" demonstrates compatibility of the Vectors
utility with the pre-Version 3.2 interface, and also points out some
of the minor differences. Two frames are produced, as follows:
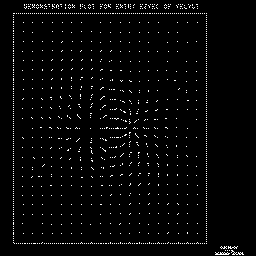
- The first frame demonstrates the use of the routine EZVEC to plot
a vector field. Only the vector component arrays and array dimensions
are required in the argument list. The only differences between this
plot and one produced by the same test prior to Version 3.2 are that
1) Vectors now draws the arrowheads as a polygonal figure using four
lines rather than as a two line polyline. and 2) the maximum vector
legend title is rendered using high quality text and is
right-justified relative to the lower left corner of the viewspace.
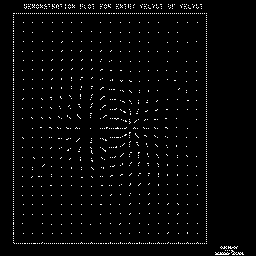
- The second frame uses the VELVCT entry point to plot the same
vector field. Here the user must supply values for more arguments,
although in this test only default values are used. The resulting plot
looks identical to the one produced by EZVEC.
7.2 vvex01
The example "vvex01" also produces 2 frames, illustrating a vector
field overlaid on a polar soft-filled contour plot. Many capabilities
of the Vectors utility are illustrated in this
example. First an area map is created and the contour map is
drawn. Then the vectors are drawn masked to the area map. The
Vectors mapping parameter is set to 2 specifying a
polar mapping; and the data coordinate boundaries are defined
appropriately. The special color flag is set to indicate that the P
array will contain special values; next the P array special value
parameter is set to the value used for special values in the
data. Various parameters are set to control the size and spacing of
the vectors.
- In Frame 1 the same scalar array used to create the contour map
supplies the data for coloring the vectors. The correspondence of the
vector colors to the highs and lows of the contour map is quite
apparent.
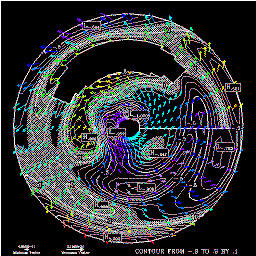
- Frame 2 draws the same picture, except that in this case the
vectors are colored according to their relative magnitude.
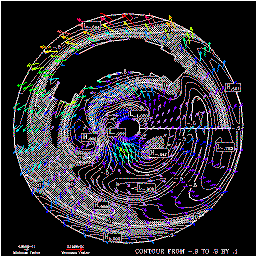
7.3 vvex02
The example "vvex02" produces 10 frames, one for each of the supported
EZMAP projections. Except for the Lambert conformal conic projection,
all the frames show the maximum possible area of the globe visible
with that projection. The same randomly generated vector component
data, treated as a globe-covering grid, is applied to each
projection. Alternate frames are colored either according to the data
contained in a randomly generated scalar array, or according to
magnitude. The fifth through the tenth frames use additional
parameter-setting calls to modify the size of the maximum and minimum
vectors, as well as to eliminate the vectors with magnitudes in the
bottom 20 percentile range.
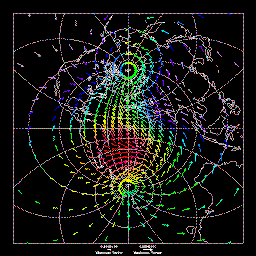
Note that while for some of the projections the whole surface of the
globe is visible, others show only a portion of the globe. The grid
boundaries can remain the same in either case: vectors that map to
areas outside the visible boundaries of the projection are simply
discarded. The vector statistics flag parameter, VST, is set on,
allowing you to see at a glance (among other things) the number of
vectors thrown away.
7.4 vvex03
The example "vvex03" demonstrates how to create user-defined mappings
of vector data using the user-modifiable mapping routine, VVUMXY. Its
three frames illustrate three potentially useful mappings:
- Frame 1 shows a method for plotting an irregular rectangular grid
of vector data.
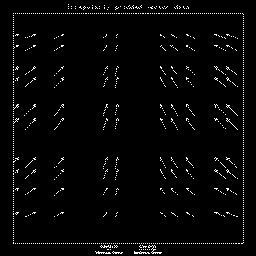
- Frame 2 plots a scattered vector data set.
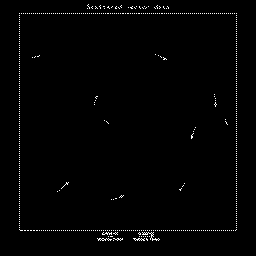
- Frame 3 maps a scatted vector data set onto an Ezmap projection.
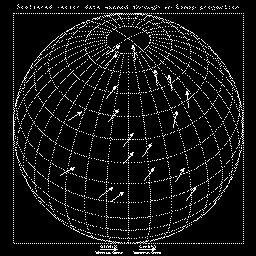
Given these examples the user should not have much difficulty
producing other permutations such as projecting an irregularly gridded
dataset through Ezmap.
7.5 Other Examples
See the section, Field
flows, in NCAR Graphics
Fundamentals, UNIX Version, for descriptions of more examples
involving the Vectors utility.
INDEX